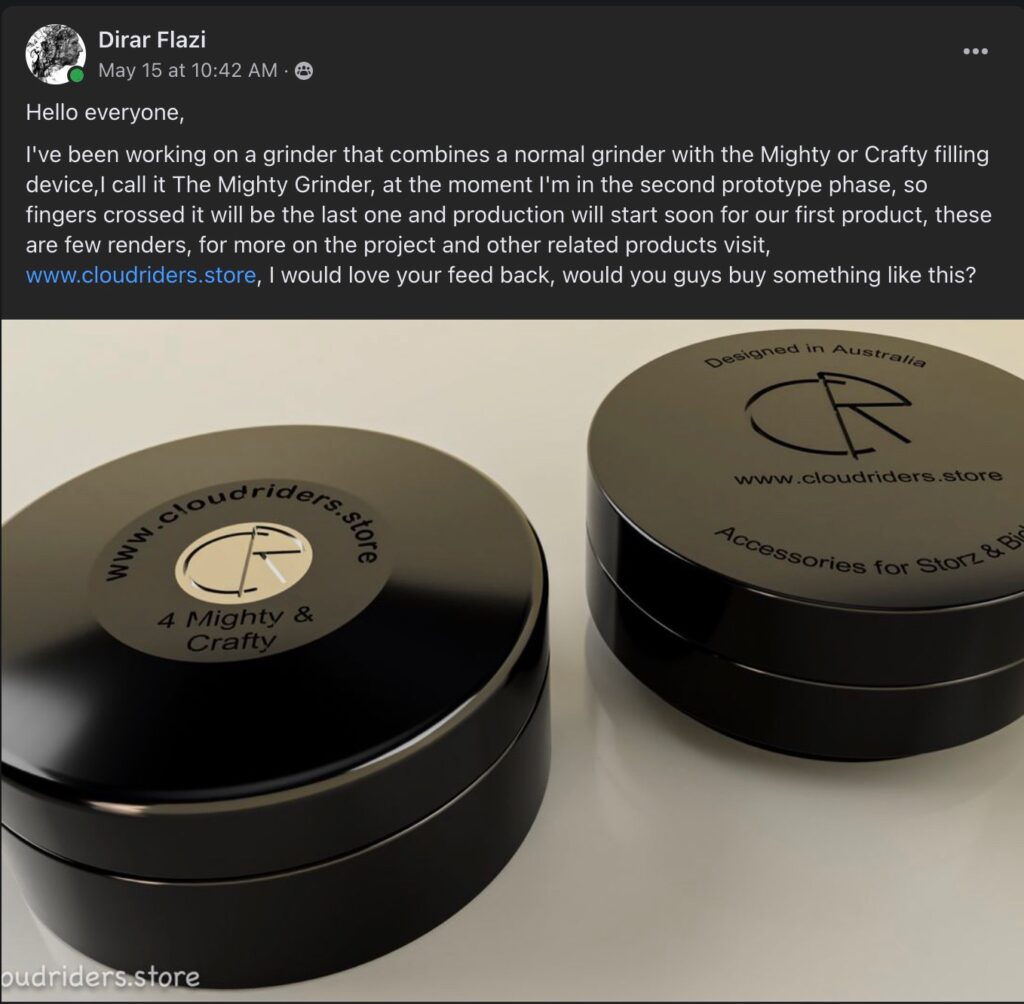
Hello, and welcome to Cloud Riders Store, where I design, manufacture and sell accessories for Storz & Bickel Vaporisers (source manufacture). At the moment I’m working on few projects, the Mighty Grinder is the main one. It’s a Grinder that fits on the Mighty & Crafty vaporiser, using a similar filling aid device so you can grind right into it and savour every trichome. Also I’m in the middle of moving from Melbourne to the Netherlands and I’m almost finished designing and testing a Charging Stand for the Mighty.
I want to start with a big ONE,
The Price:
Up until now, I couldn’t commit to a retail price, I had a target price when I started working on this project, but throughout the quoting phase I wasn’t sure if I will be able to achieve it, but now I can say with confidence that the grinder set will cost between $45 – $50 USD.
That’s for the set, of one grinder & one filling aid, the option of adding filling aids will be available, incase you need more than one filling aid, one for each strain.
Shipping will play a big factor, at the moment shipping is really expensive, but I have to say; This is very, very close to the price I had in mind when I started this project, I wanted my product to be smart, good looking and affordable.
And here we are, this is the only grinder in the market that is made to fit the Mighty & Crafty vaporiser, and it’s made of high quality materials with a slick design and affordable price tag.
Regarding the design, I have made a slight change last week after using the filling aid for a week, I decided that I hated the thread. so I made a custom thread, and as you can see in the picture, the old thread on the left, it was a standard thread, and you had to turn 3 X 360 degrees to open or replace the lid or the grinder.
Old thread Vs New thread
On the right the new thread.
Now it’s only 55% of a full circle to open or close the lid or the grinder, which will get me good reviews according to my son, he thought the old thread will get me bad reviews, I totally agree.
Moving to a different subject, at the moment I’m working on few strategies to bring this product to market:
The first one is to find dealers in Australia:
Now I obviously prefer to find one dealer for Australia that will order a minimum of a 1000pcs and that way he get the exclusive retail rights for Australia and I get to launch my product.
A less favourable option will be to have a dealer on the East Coast and a dealer for Melbourne and Perth.
Or I have to find five dealers one in each city.
All these options are on the table.
Another strategy is Indiegogo.com, And as you know from my previous post, I have started a Pre-Campaign there, Link if you like to sign up
And a third strategy of ordering a 100 pieces, where the Aluminium is made on CNC and the plastic is 3d printed, that way I can bring a small patch.
The downfall of the third option is that, the 3d print quality is not as good as the moulding and it’s far more expensive, four times to be exact, but I don’t have to buy moulds for the first run.
Marketing wise, I will be recording a video this weekend with the prototype, showing how it works and explaining the product.
That will allow me to start my campaign on Indiegogo.
So that’s it for this week, I feel like this post is the end of the week meeting, it’s good to tell even if no one is listening.
Hello, and welcome to Cloud Riders Store, where I design, manufacture and sell accessories for Storz & Bickel Vaporisers (source manufacture). At the moment I’m working on few projects, the Mighty Grinder is the main one. It’s a Grinder that fits on the Mighty & Crafty vaporiser, using a similar filling aid device so you can grind right into it and savour every trichome. Also I’m in the middle of moving from Melbourne to the Netherlands and I’m almost finished designing and testing a Charging Stand for the Mighty.
It has been a busy week, I’ve fired one of my potential suppliers, the one that was making the sample, and look like I will be partnering with a distributor in Toronto, and I’m in negotiations with another one in NY. Soon we will have a sales team.
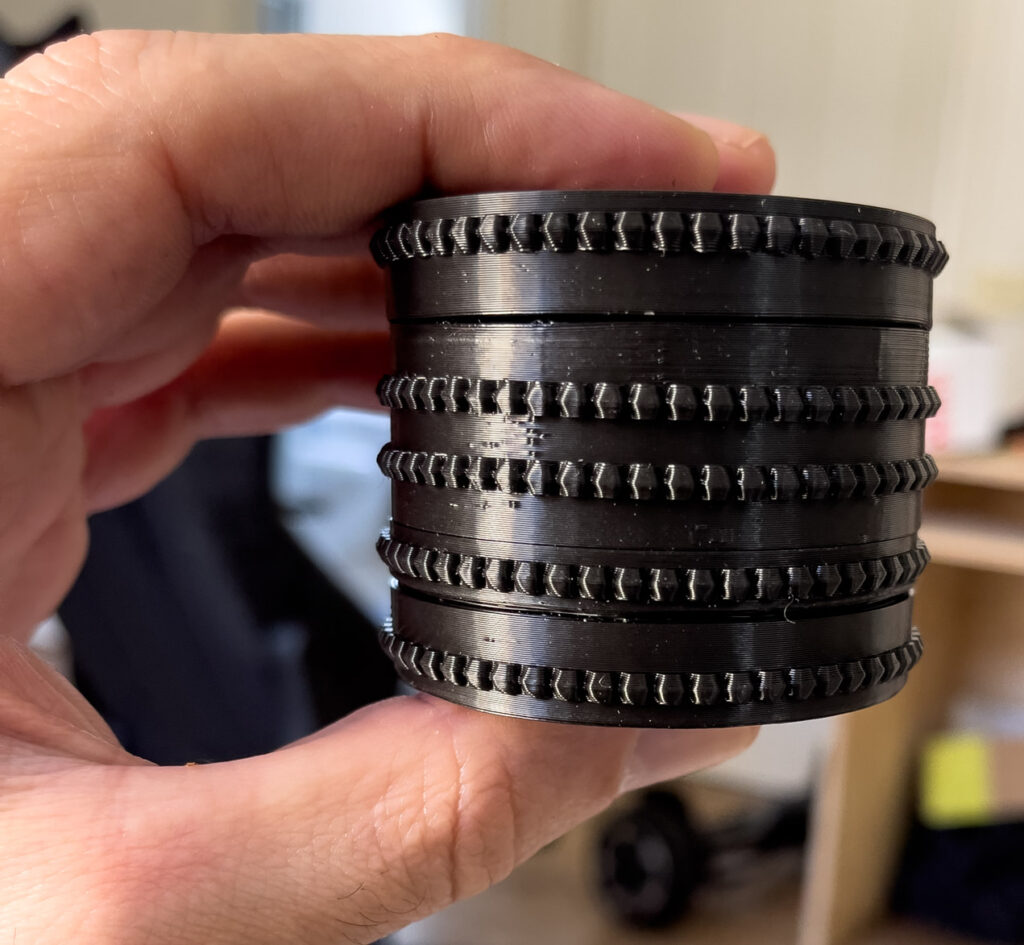
But as I promised last week, these are the shots of the printed prototypes.
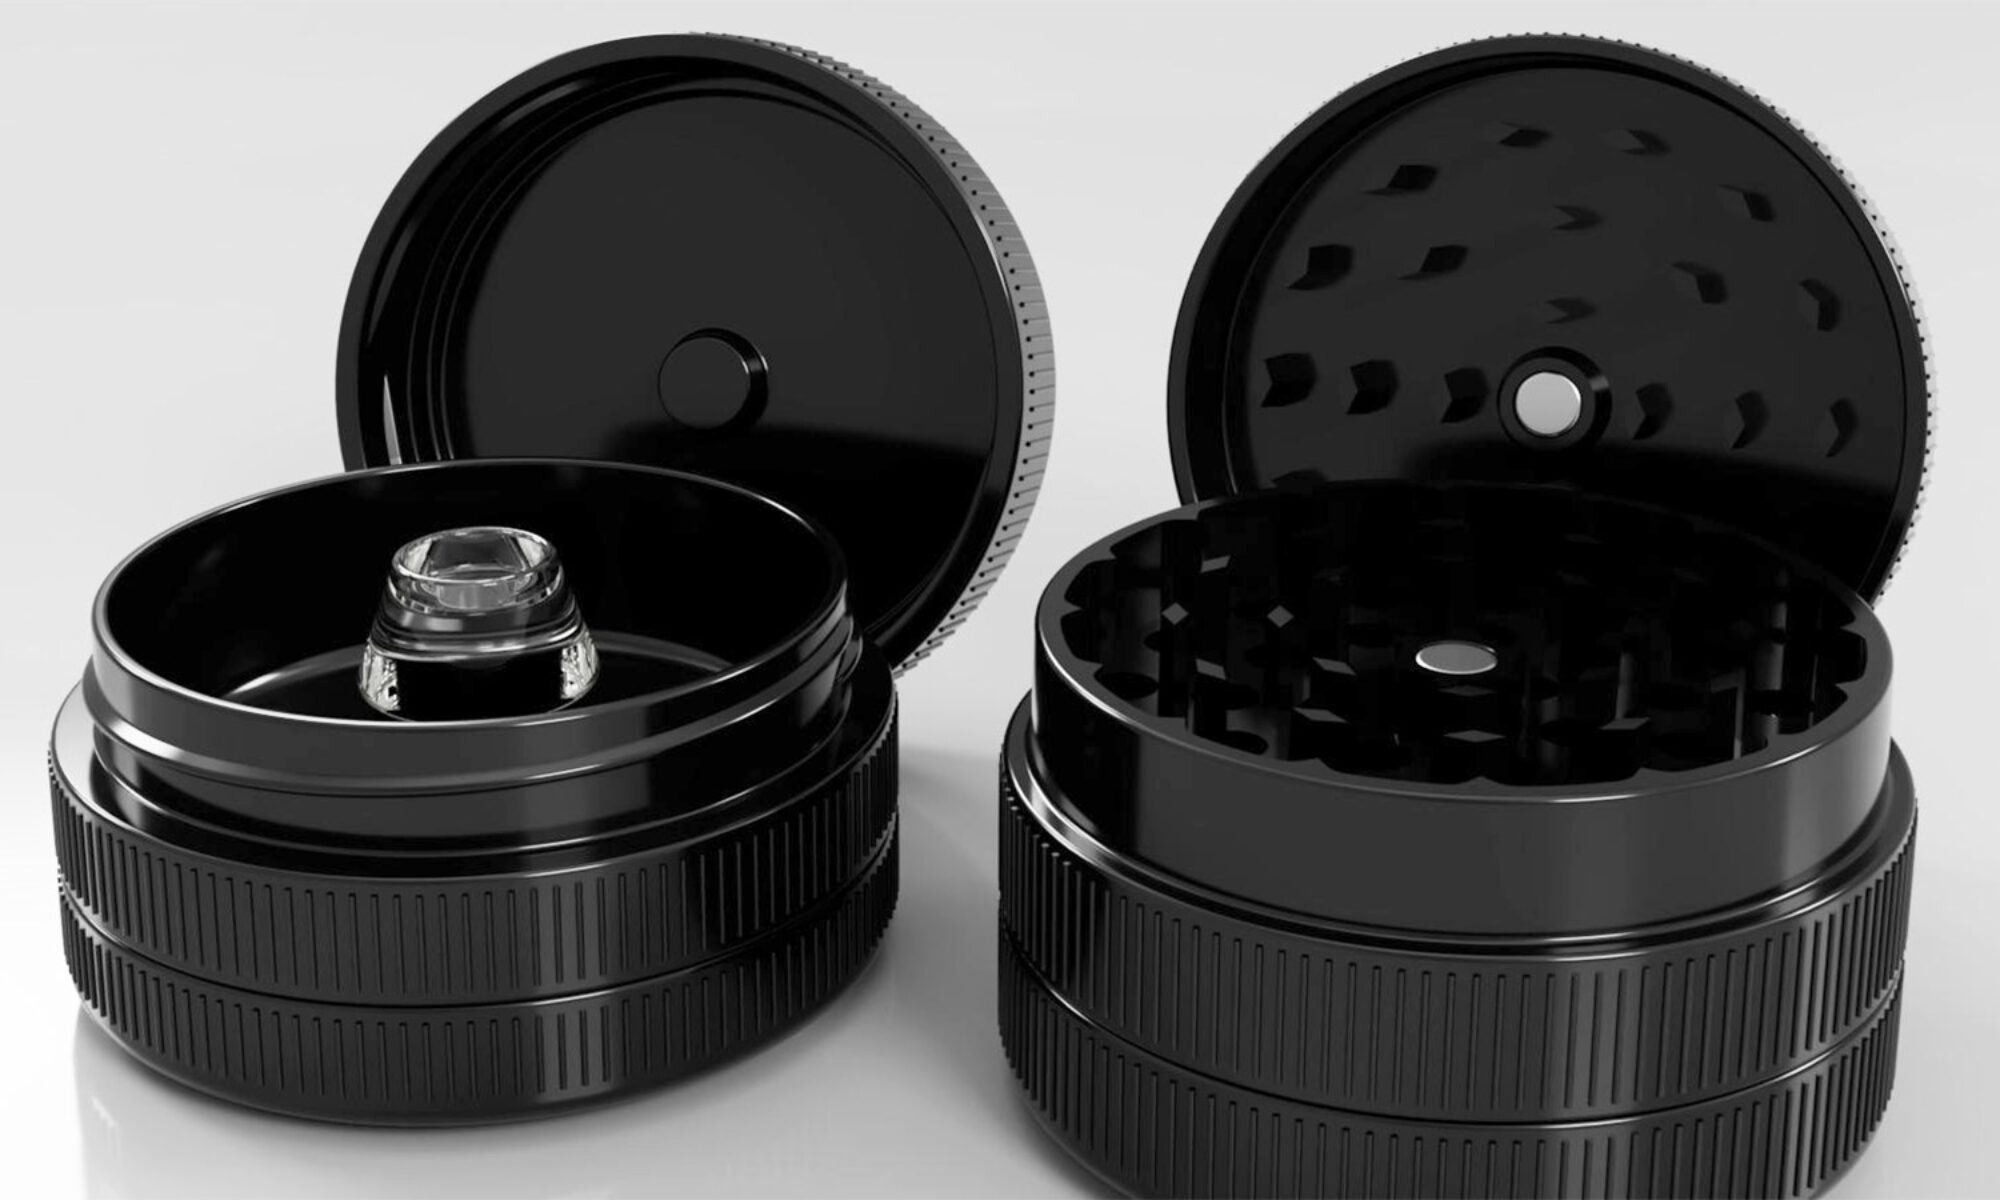
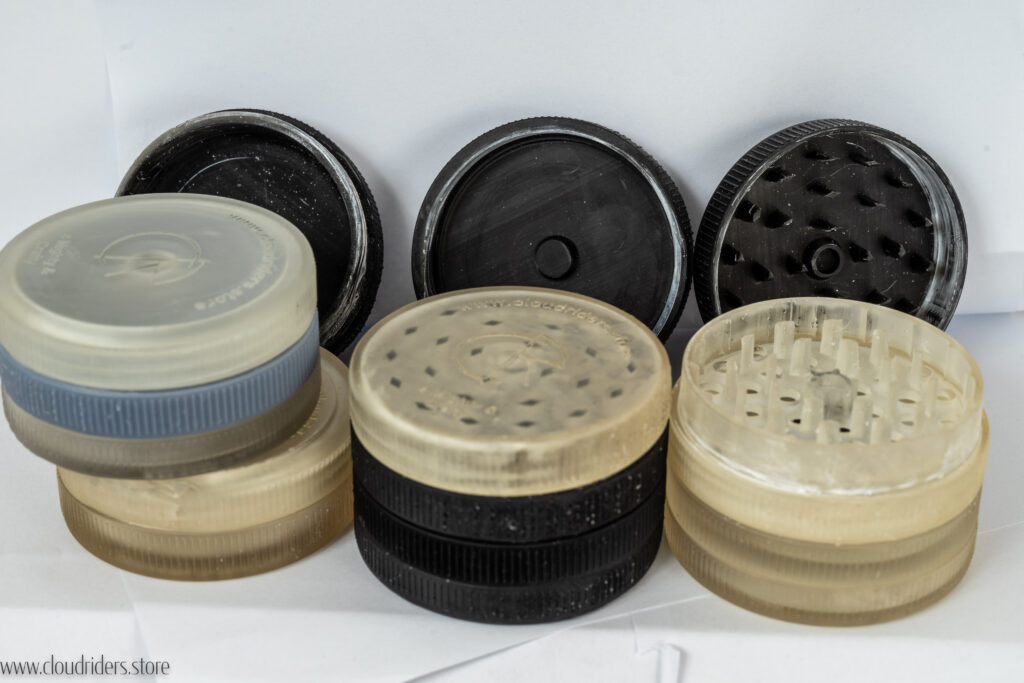
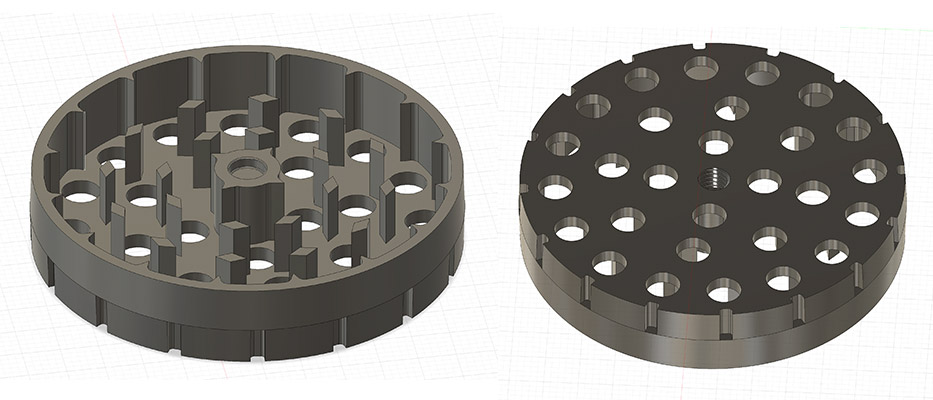
The Grinder
So the grinder itself, is a simple grinder, I didn’t reinvent the wheel, I just canceled the forth layer, honestly I don’t understand why would you separate your herbs from their Trichomes, it’s like keeping your favourite chocolate until the end. I say let us eat the best chocolate now.
Grinder top Off
As you can see, Just a simple Grinding plate, obviously this is a 3d printed prototype, the grinder will be made out of Aluminium. 6061 T6 and it will be sand blasted and anodized.
All the grinder parts
And here are all the grinder parts. Missing the magnets.
Grinder on the Mighty
Now Obviously this isn’t the ideal way to grind, But this is the grinder on the top of the filling aid, and the filling aid is fitted to the mighty.
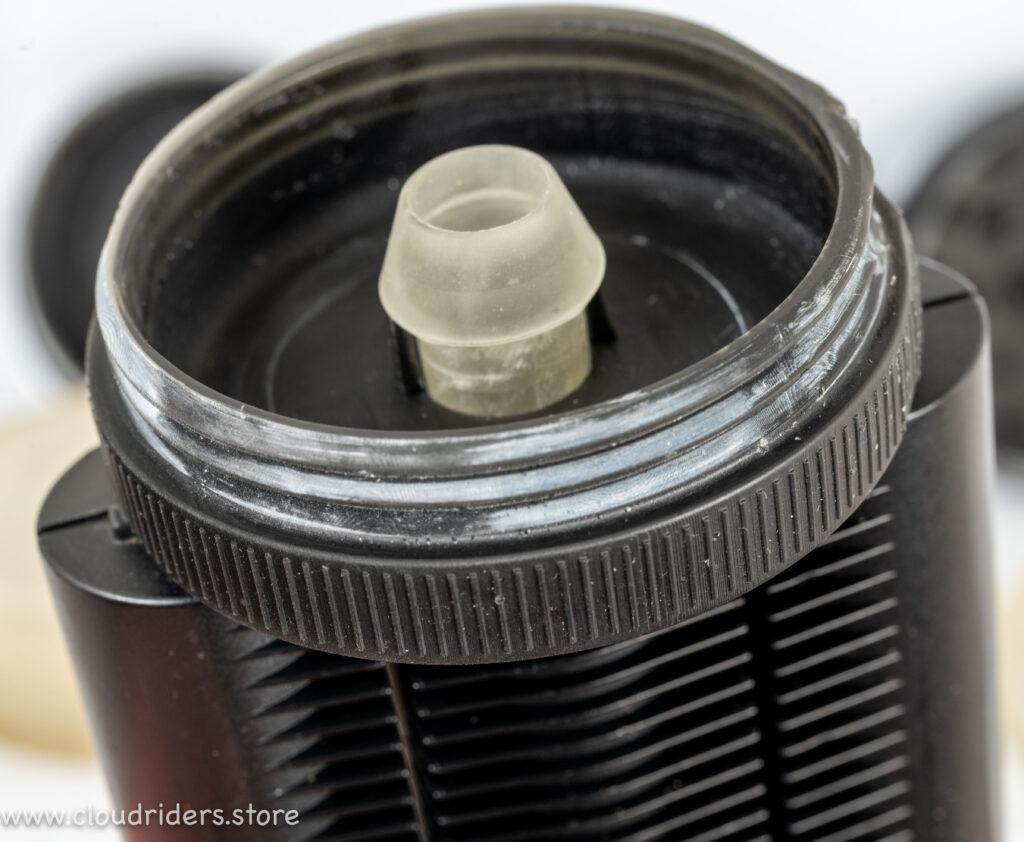
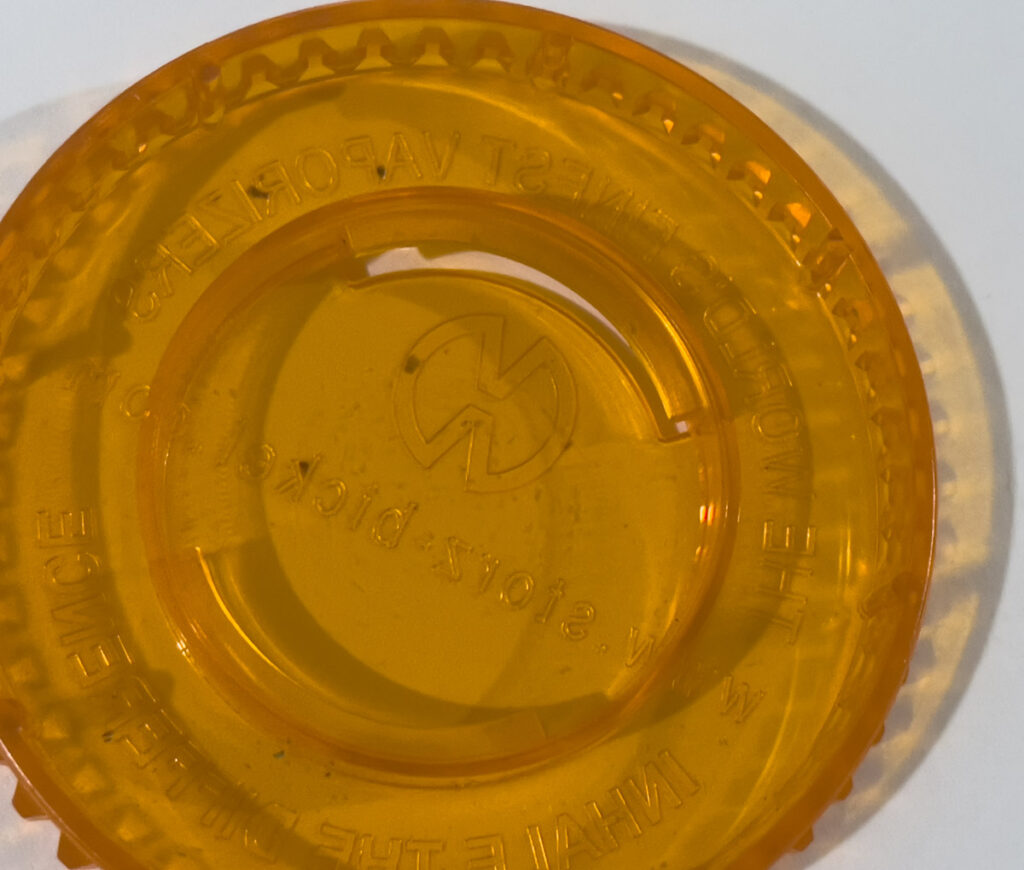
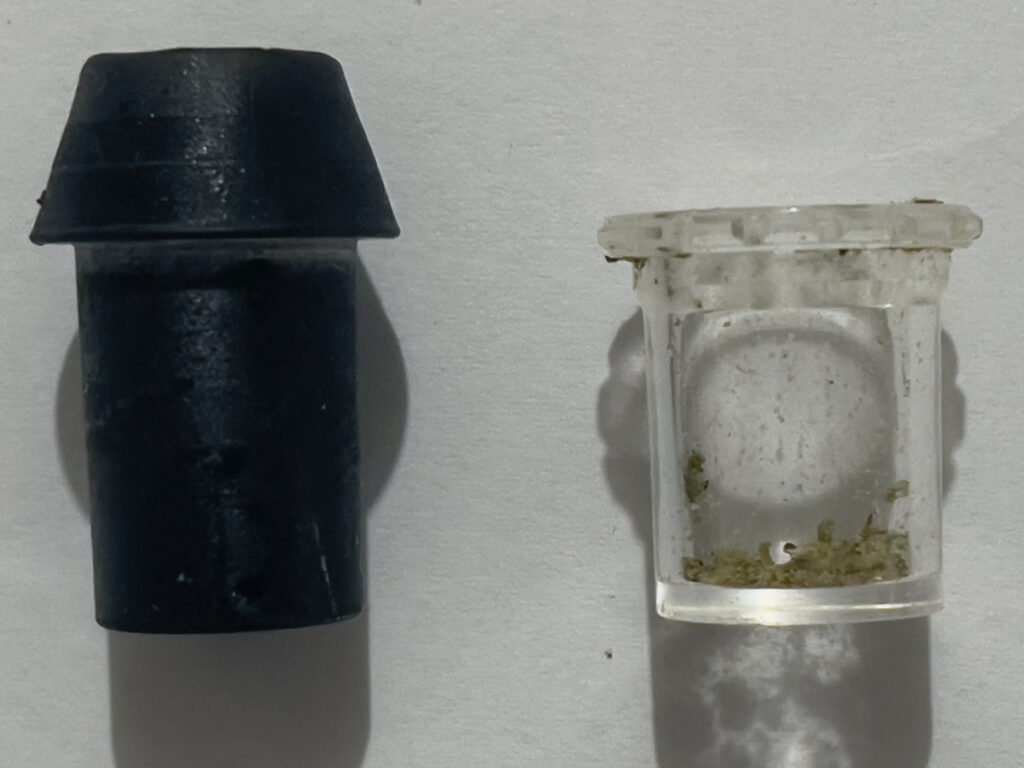
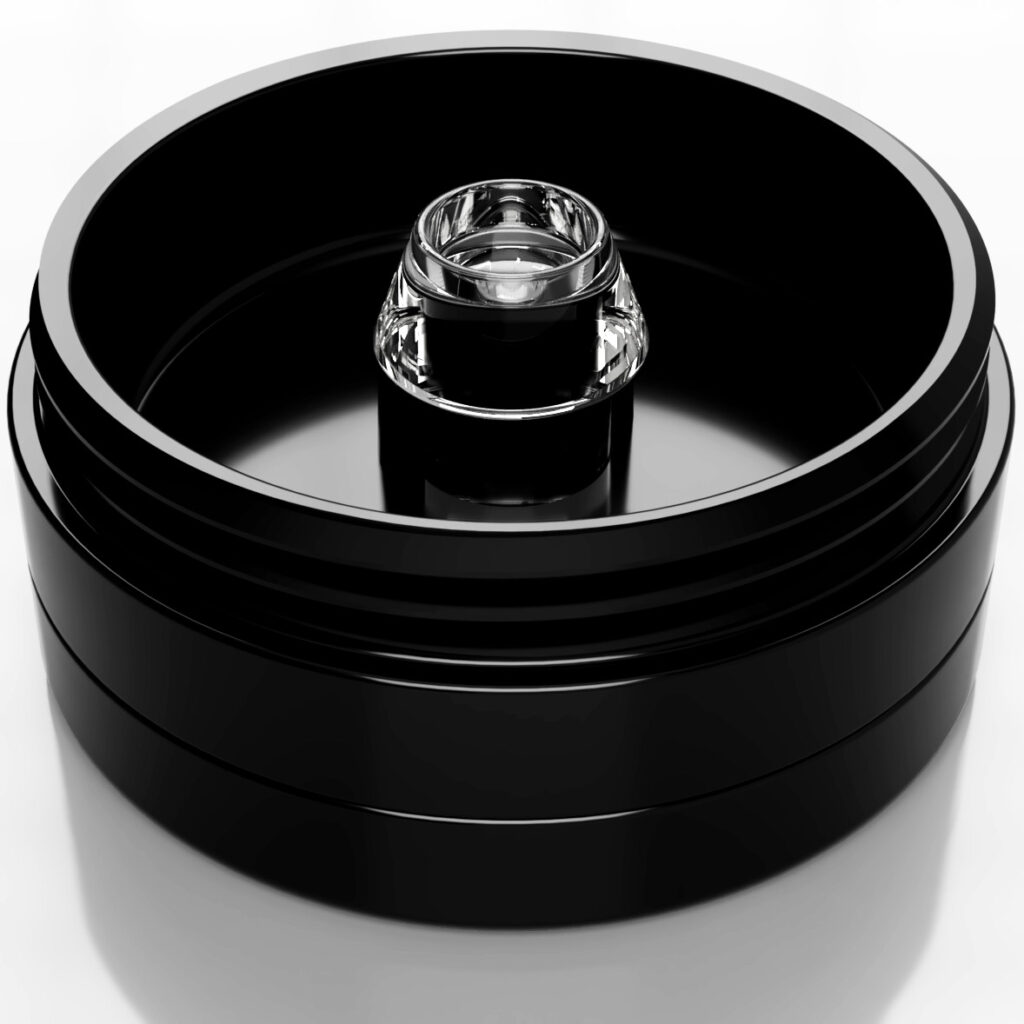
Transparent Filling Aid.
And this is the filling aid without the grinding bit, fitted to the Mighty
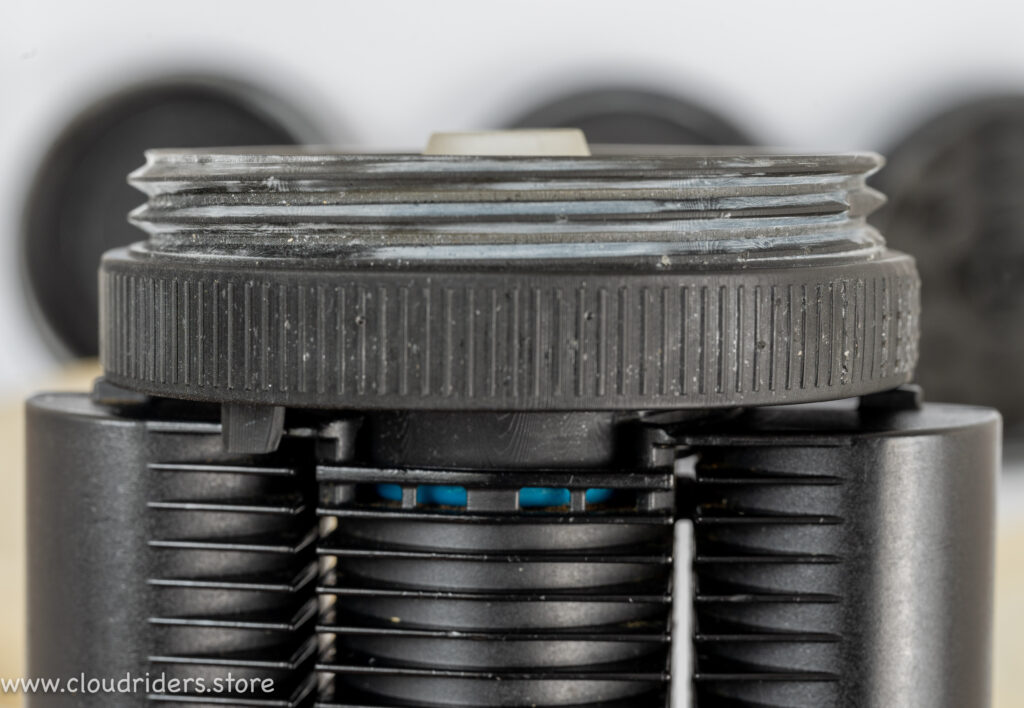
Filling aid with the grinder on the mighty
As you can see from here, It’s a perfect fit.
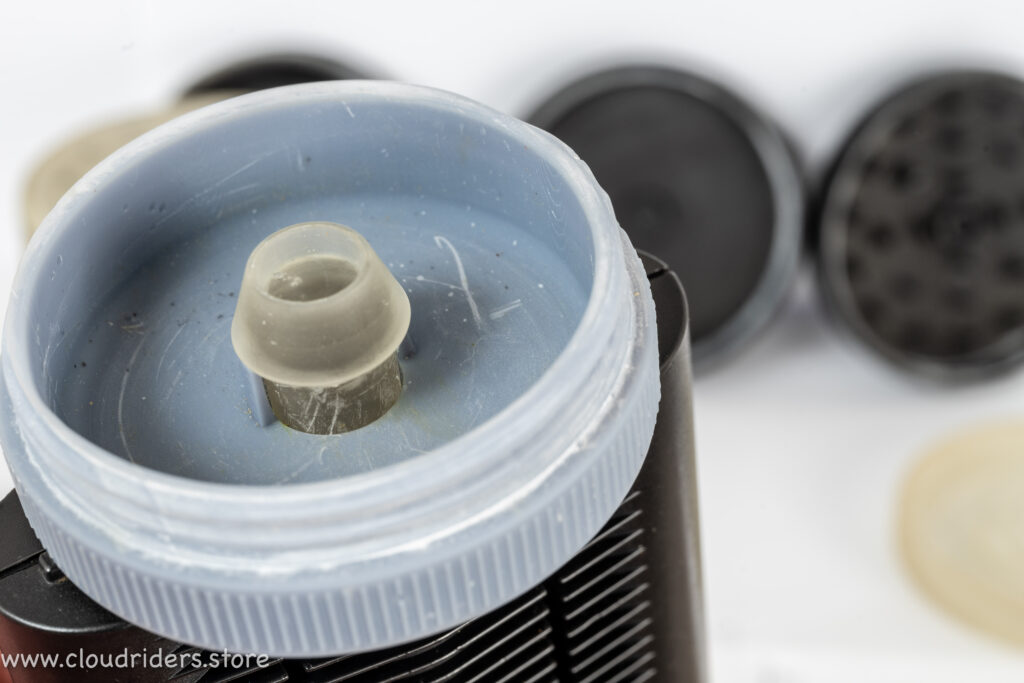
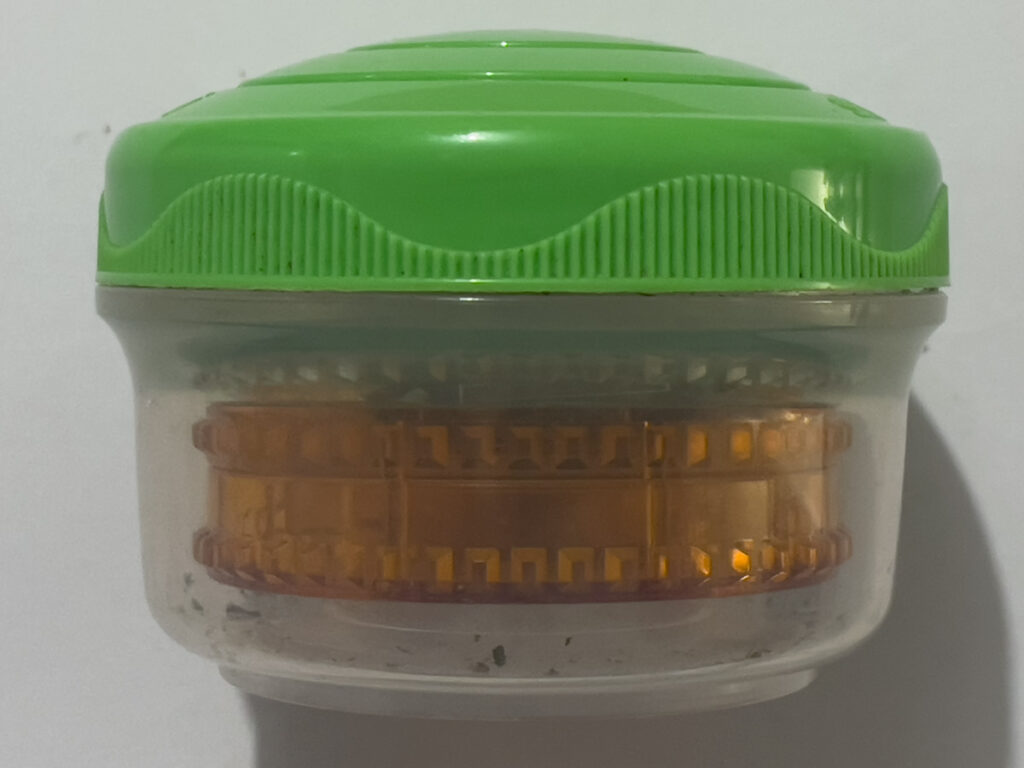
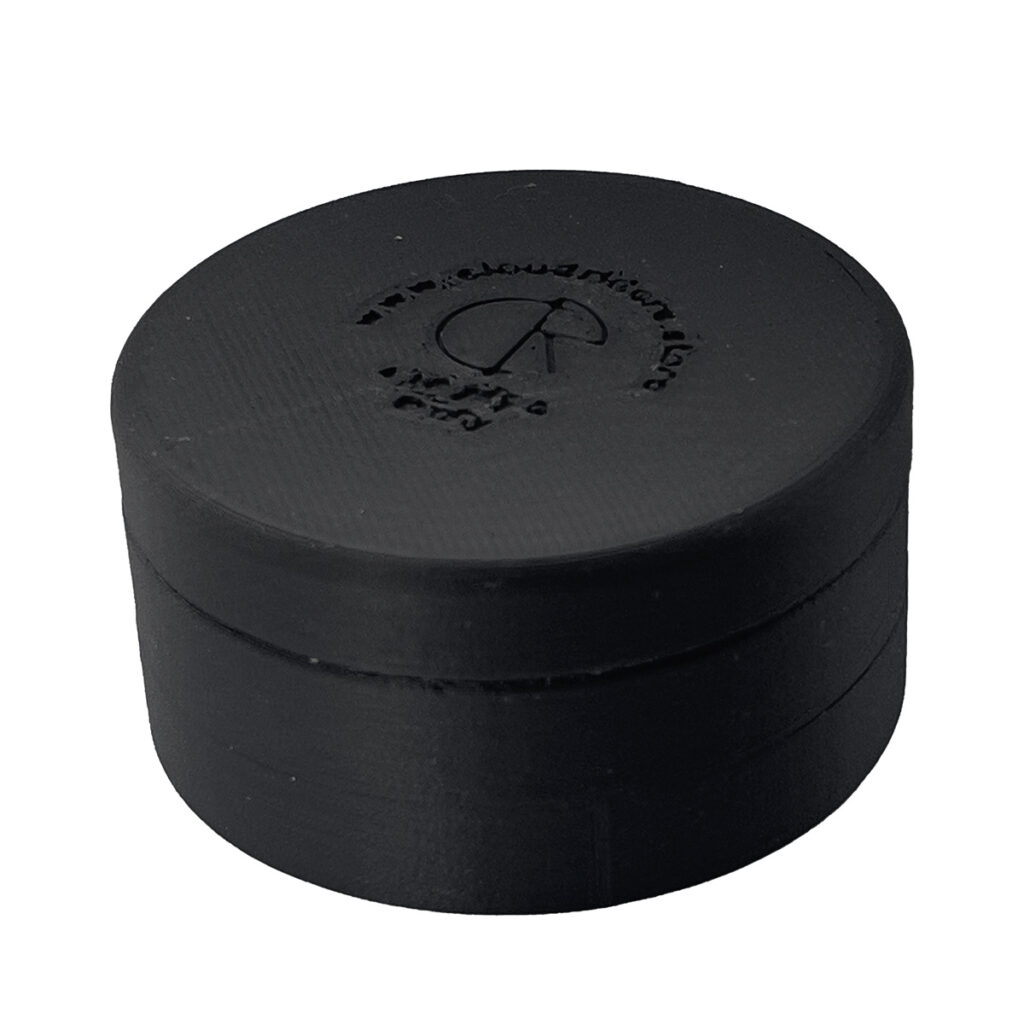
Black filling aid
As you can see my filling aid is bigger, allowing you to store more herbs, but also because it’s air-tight, the herbs will stay fresh for much longer.
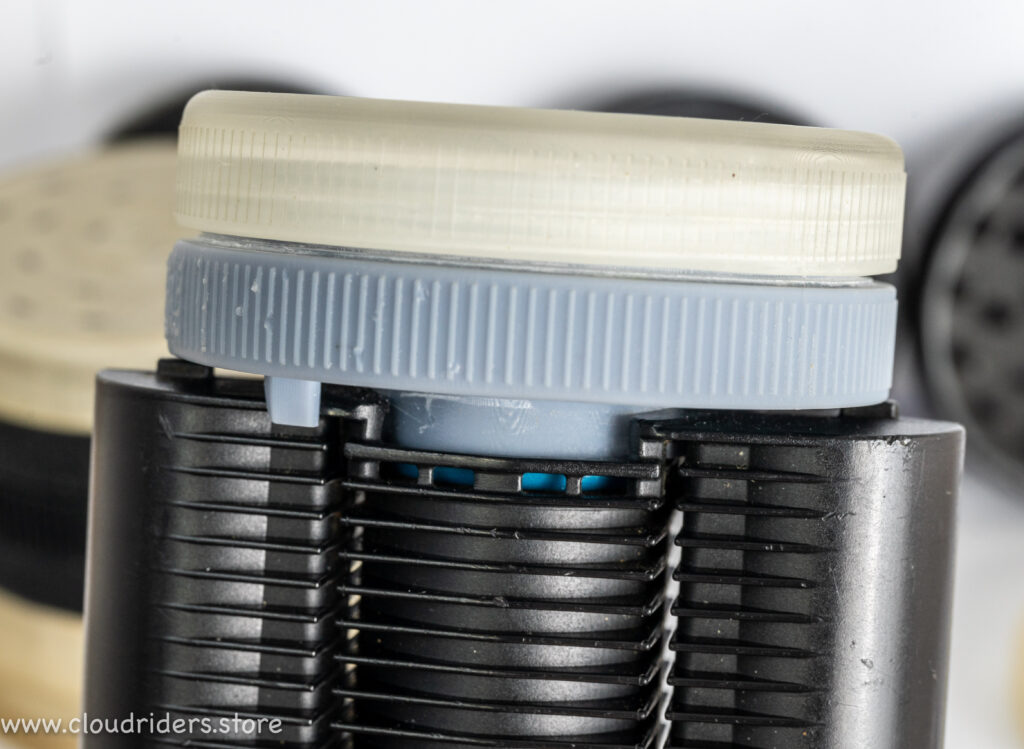
Black filling aid, perfect fit
As you can see, It’s a perfect fit. as if it’s made for the Mighty & Crafty 😉
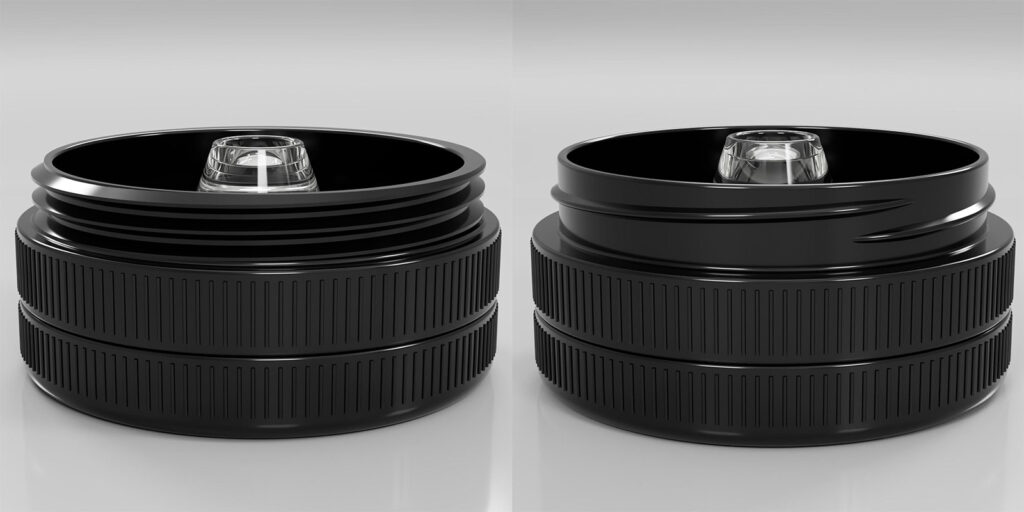
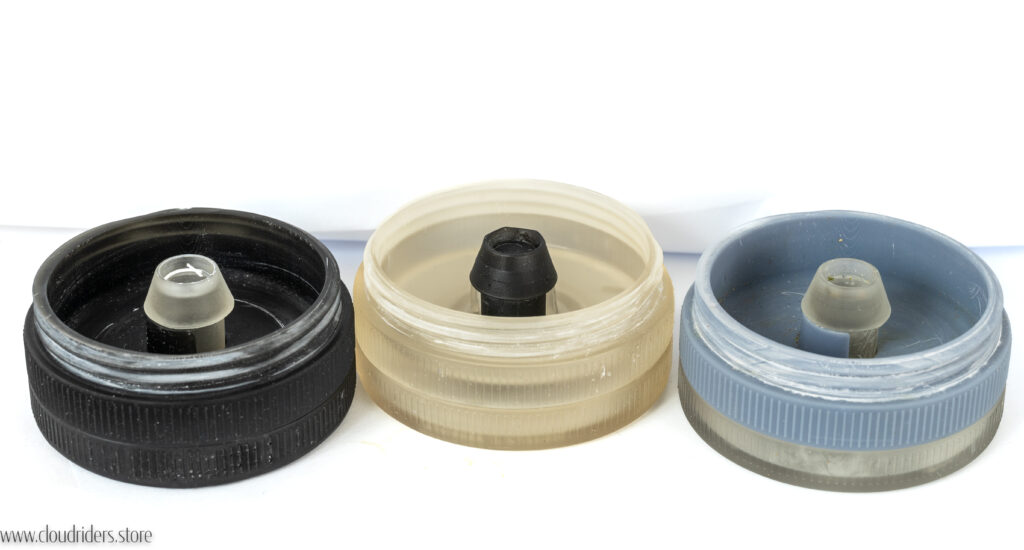
Black filling aid profile on the MightyGrey Filling Aid on the MightyFilling Aid with the Lid on the Mighty
And this is the filling aid with the lid instead of the grinding bit, so as you can see the Grinder is interchangeable with the filling aid so in the picture below you can see the other configurations
Four configurations
In this picture you can see three configurations, starting from the right, that is the grinder without the lid screwed to the filling Aid.
And in the middle we have the grinder with the filling aid, so this is how you will grind if you want to fill the Mighty or the Crafty after.
And then on the left top we have have a Filling Aid and below it, flowers storage.
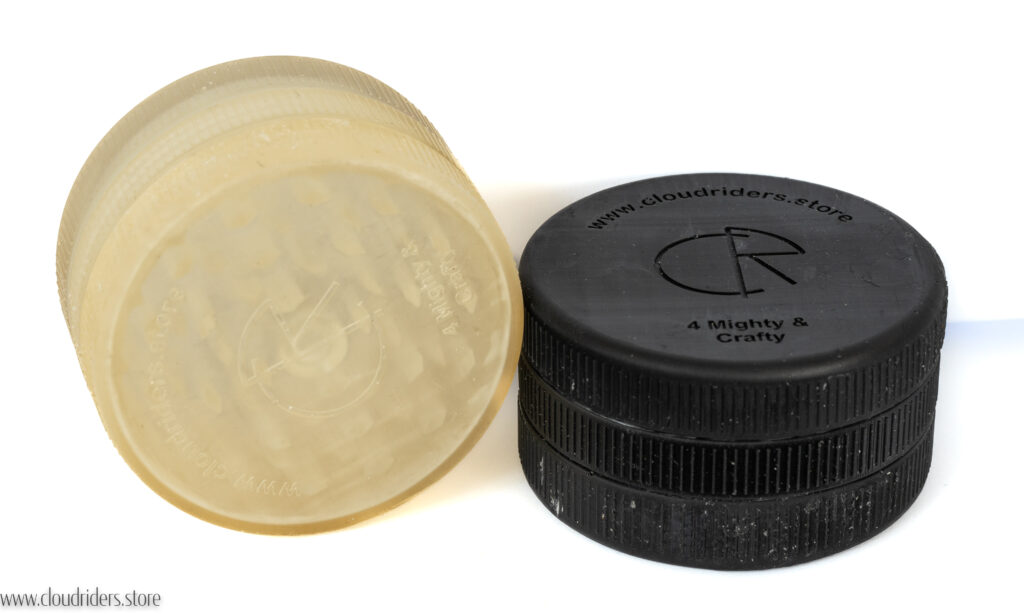
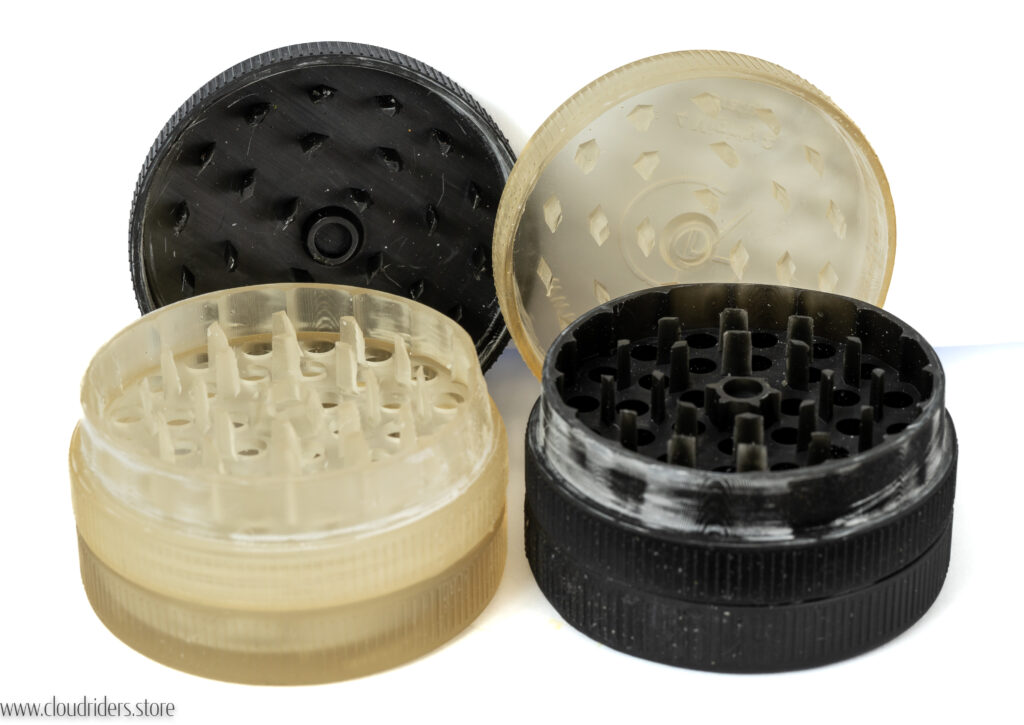
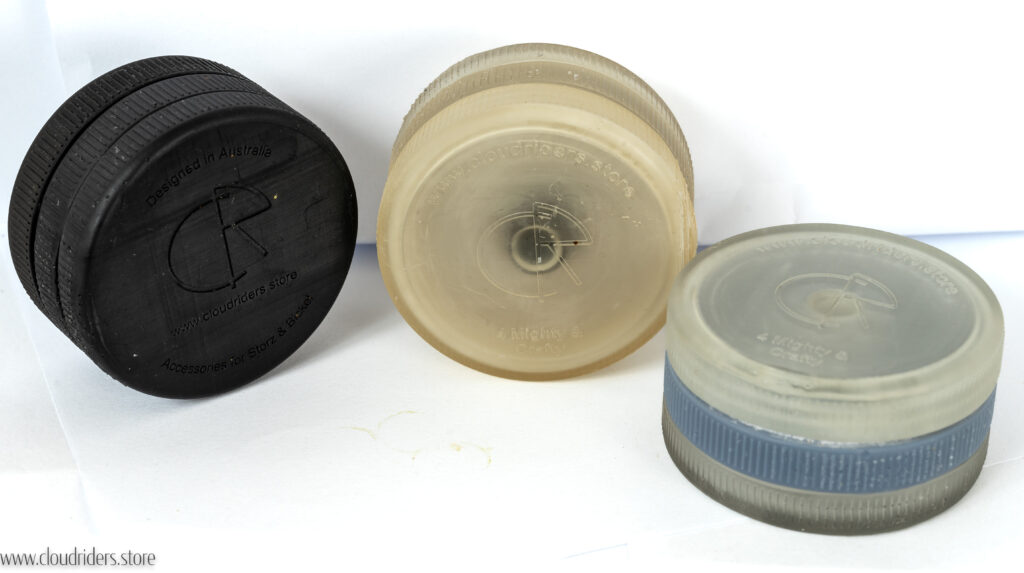
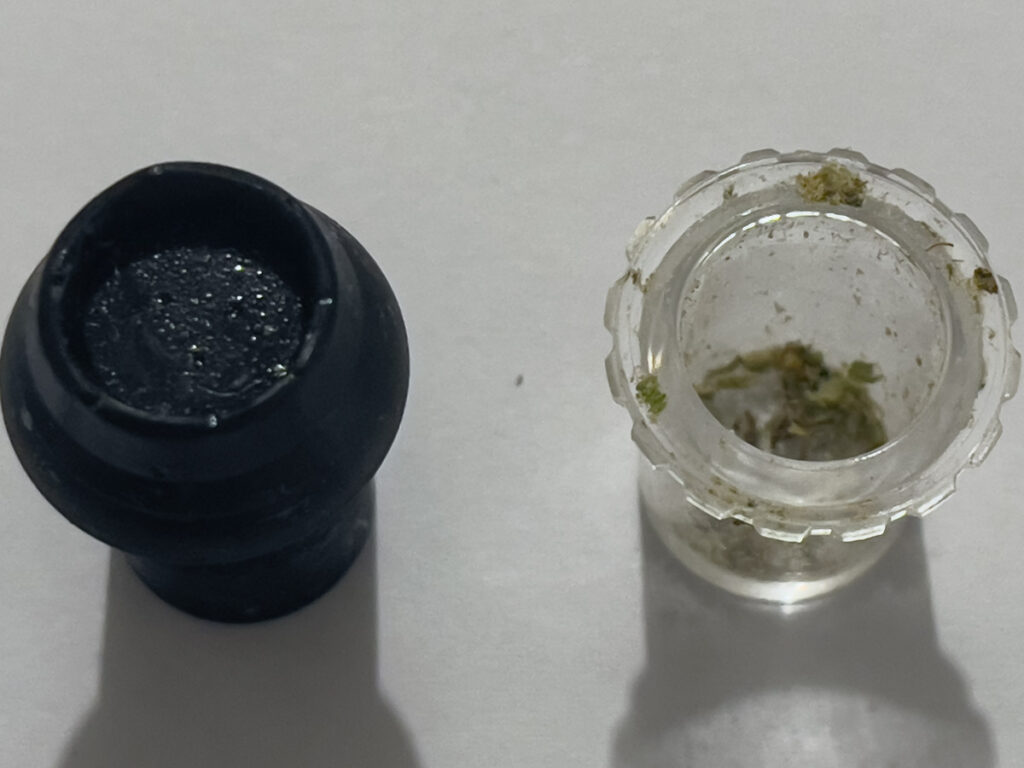
3 Filling Aids for Mighty and Crafty
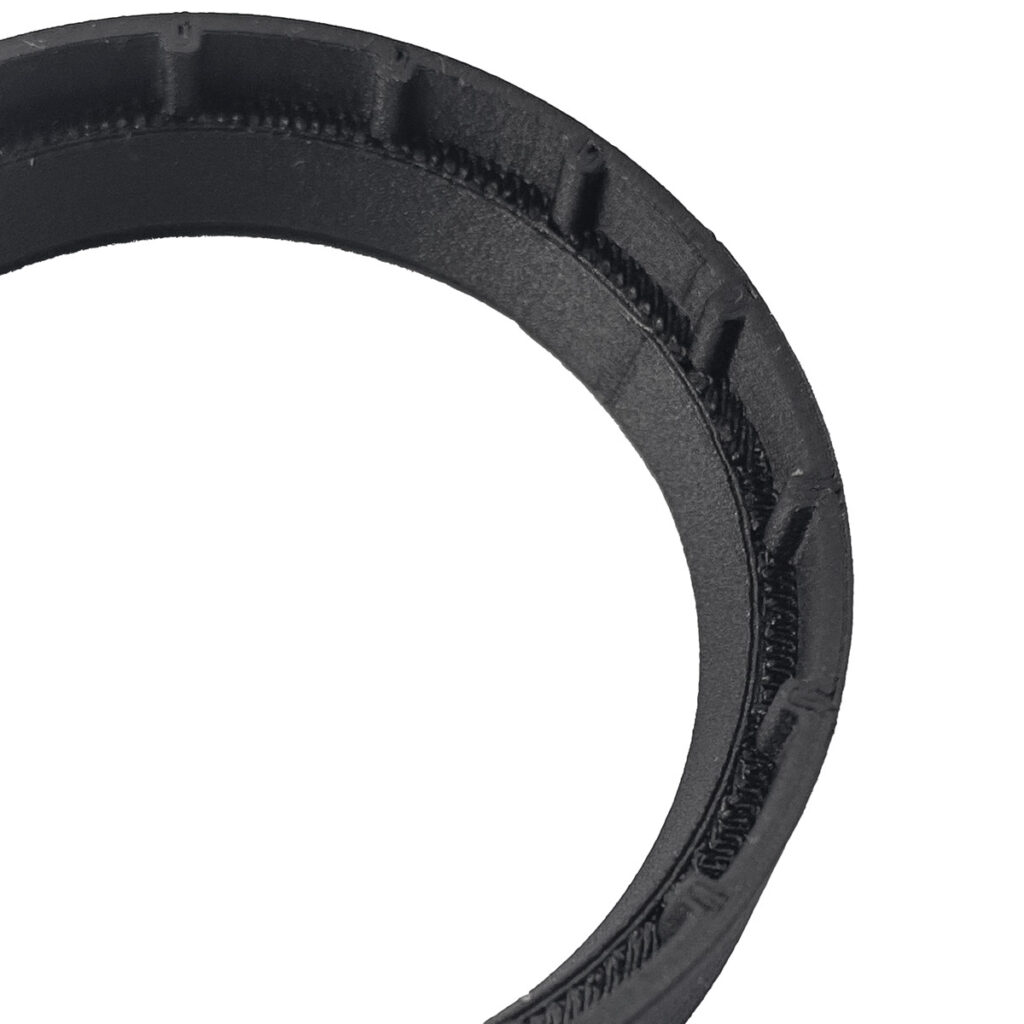
These are the filling Aids without the Lid, you can see the thread, same thread like the grinder, same diameter.
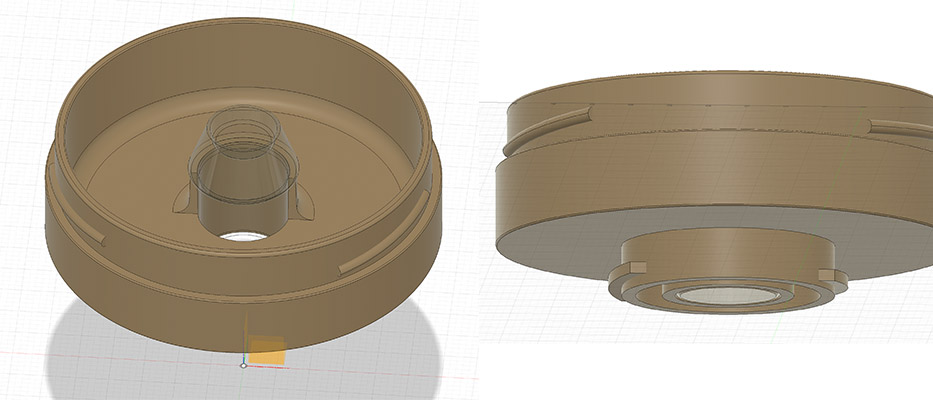
Filling Aid Bottom Side
Here You can see how it’s made to fit the Mighty & Crafty and you can see the new upgraded bottom cap, with air-tight design.
All new filling aids for Might & Crafty
So now after looking at all the pictues, I’m thinking Black shouldn’t be the only colour, I’m happy I’ve printed with different colours.
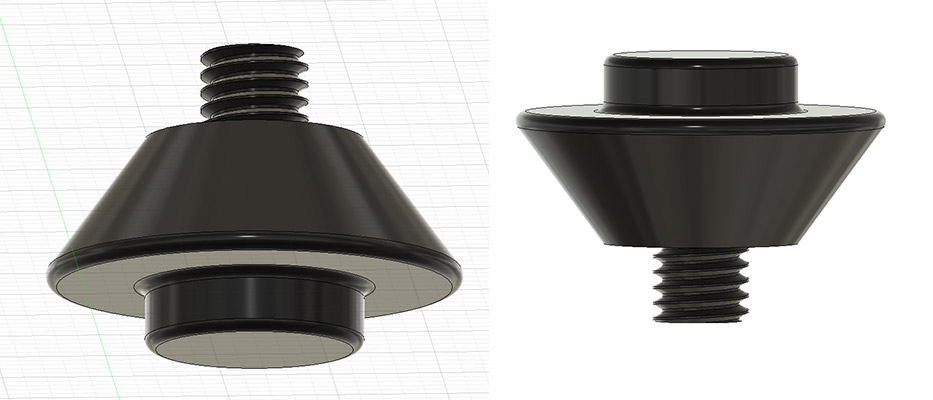
The Asher
And finally in this picture you can see how I got around getting the plug full of herbs, everytime you fill the stock filling aid.
I have been talking about water proof, and I’ve achieved it, the new design is water proof, and I don’t mean the grinder itself, but I mean the Filling Aid.
This 3d printed Filling Aid is water proof, so if it’s on a table, “At the end of the party and it’s the last herbs left”, and the inevitable beer spill happens, your herbs will stay DRY.
In my head, I can hear the crowds cheering in the background, “Waterproof! WOW, You are a genius” lol.
Now again, not to take it scuba diving.
I have to point here, that my 3D print is nowhere as accurate as industrial printing or moulded plastic, and the material will play a major role also, so; What I’m trying to say is the product will be of better quality.
I added Knurling as you can see in the pictures, so it’s not slippery, especially in the cold.
I have been using the filling aid for few days now, and the only improvement I’m going to make is to the thread, I will make it a bit shorter, will do that over the weekend before printing with ABS like material, this will be my last print.
But on the subject of prototype & final design I think I will keep on adding improvements to it, well until I can’t because it’s in your hand.
Apart from that, we are very close to the release, I think next week I will have a date for the first order.
Hello, and welcome to Cloud Riders Store, where I design, manufacture and sell accessories for Storz & Bickel Vaporisers (source manufacture). At the moment I’m working on few projects, the Mighty Grinder is the main one. It’s a Grinder that fits on the Mighty & Crafty vaporiser, using a similar filling aid device so you can grind right into it and savour every trichome. Also I’m in the middle of moving from Melbourne to the Netherlands and I’m almost finished designing and testing a Charging Stand for the Mighty.
You guessed it, I bought a 3d printer, nothing fancy though, just to finally really rapidly prototype, and we’ve been busy, Learning to 3d print and rapidly prototyping, lol.
It’s great, I have printed three filling aids, just to perfect the fit on the mighty, not loose, but not very firm ;), and I believe I’ve nailed it, while I’m writing this post, the Anycubic Photon Mono 4k is printing the last plastic prototype, I hope. 🤞
3d Printed prototype
This is the previous print, you can see clearly, I’ve printed it on the plate because the one before failed, one of the part didn’t stick, but I was printing horizontally, this one I’ve printed vertically as you can see, I have to say the printing quantity is pretty impressive, look at the engraving from this $300 printer comparing to last week prints.
Apart from fiddling around with the printer, I belive I’ve achieved an airtight filling aid, let me show you how.
Airtight Mighty grinder
As you can see in the section analysis, I’ve ditched the old locking mechanism I was using, and used normal thread, now to achieve that, I had to extend the diameter farther more to 62mm, nothing major, but the grinder now is chubbier and stocky, a handful. Walls are seriously thick also, nothing under 2mm,
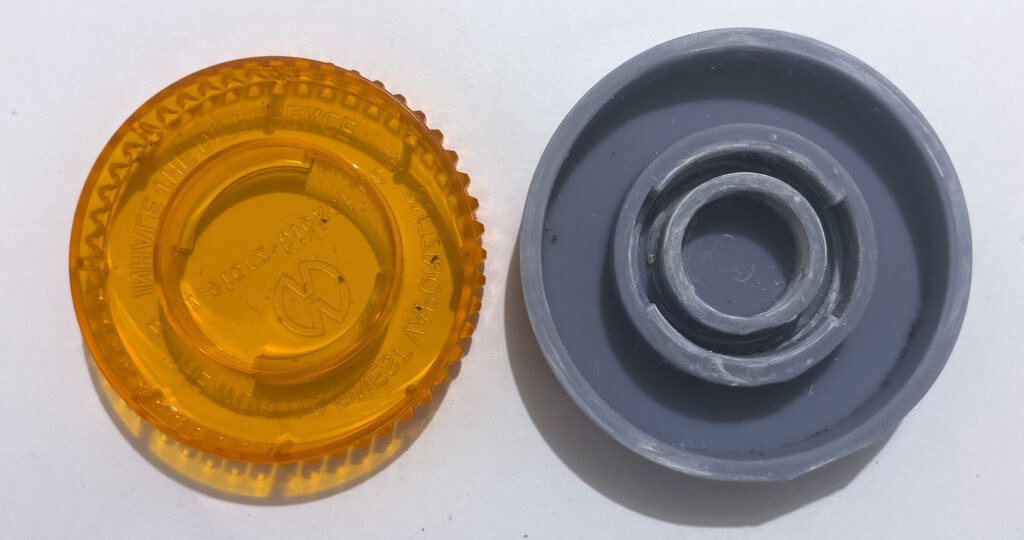
Another major change is the bottom cap of the filling aid, and while the OEM was obviously designed not to be airtight, mine is.
OEM bottom cap
Now, If We take a close look at the original bottom cap from Storz & Bickel, We can see clearly the opening, I’ve never understood it’s purpose, Dazzling.
Mine won’t dazzle the same way, opening and gaps are made for a reason, not for ventilation.
Obviously I’m obsessed with flavours, I keep my coffee beans in the freezer and I grind my Mint, Oregano and Basil just before using them, and whatever grounded, I like to keep in airtight containers.
And for that purpose I added few walls, closed few gaps, made the walls thicker so it doesn’t break after the first impact, and fingers crossed it will pass the water proof test, now I’m not saying; take it swimming, but as good as it could be considering it’s handicap.
S&B VS CRS bottom Cap
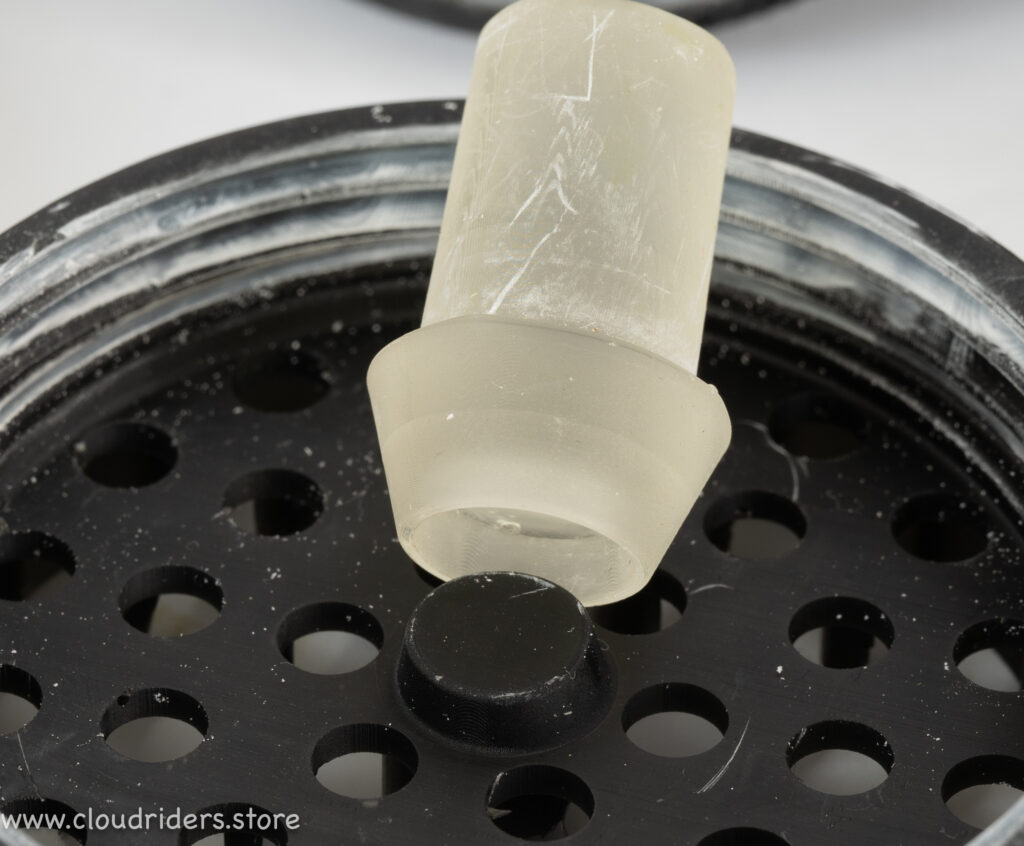
Another upgrade happened to the plug, or as I like to call it the asher, Someone once told me Size matters, so I made the walls 8.6mm high, so you can hold them with your fingers even if you were wearing gloves.
Size does matter.
And I sealed it from the top, so it’s not part of the container.
Sealed Plug with high walls.
All an all, I think I have an awesome Grinder, the 3D print just came out, it fits perfectly together and on the mighty, so I will be sending the design to get the Aluminium prototype made, it’s late, so I’m not going to take pictures of the 3d print now, as one of the parts is not perfect, and I have to print it again, but I have few renders that I’m going to share with you. and I will have nice pictures of the 3d print next week.
The Mighty GrinderAirtight filling aid Charming DesignAttention to detail.
That’s all for this week, stay safe and have a good weekend, ☮️
Hello, and welcome to Cloud Riders Store, where I design, manufacture and sell accessories for Storz & Bickel Vaporisers (source manufacture). At the moment I’m working on few projects, the Mighty Grinder is the main one. It’s a Grinder that fits on the Mighty & Crafty vaporiser, using a similar filling aid device so you can grind right into it and savour every trichome. Also I’m in the middle of moving from Melbourne to the Netherlands and I’m almost finished designing and testing a Charging Stand for the Mighty.
A lot happened last week, not sure where to start, so I’ll talk about myself a little, lol.
In the past, I used to pride myself for being a great salesman, and honesty; until now I had no idea why I used to be that good, I thought I knew, but I didn’t. Until I had to deal with so many salespeople, all together, last month, and experience first hand how hard it’s to communicate with a salesperson, most of them are so focused on the order, they don’t listen, obviously not all of them, but the majority.
Now on the other hand, some of them are even happy to help, to give first, like Adam from Markforged Australia, Markforged printed a prototype of the grinder for me, that’s 10 pcs in total, for free, yes they are trying to sell me a printer, but I found that very generous, and it was very helpful.
Although I’m not reviewing 3d printers here, but I believe the prints are of a good quality, the parts are strong, and the details are good, but the finish is not suitable for the purpose of the product. If I want to print 3D parts for engineering use, I will be definitely considering their printer, and I believe engineering clients are more their focus, but they were happy to help, which was great.
Below Images of some parts.
3d printed filling aidGrinder Housing details
And this bring us to the title. Prototype.
After seeing the prints and talking to sales about the production of the grinder plus all the feedback from engineering departments, I decided to try to simplify the design.
Being a grinder the parts are small, which mean alot of the measurements are sub millimetre, making the tolerance requierd to produce the parts 0.1mm, and I will stop here with the technical jargon, and say;
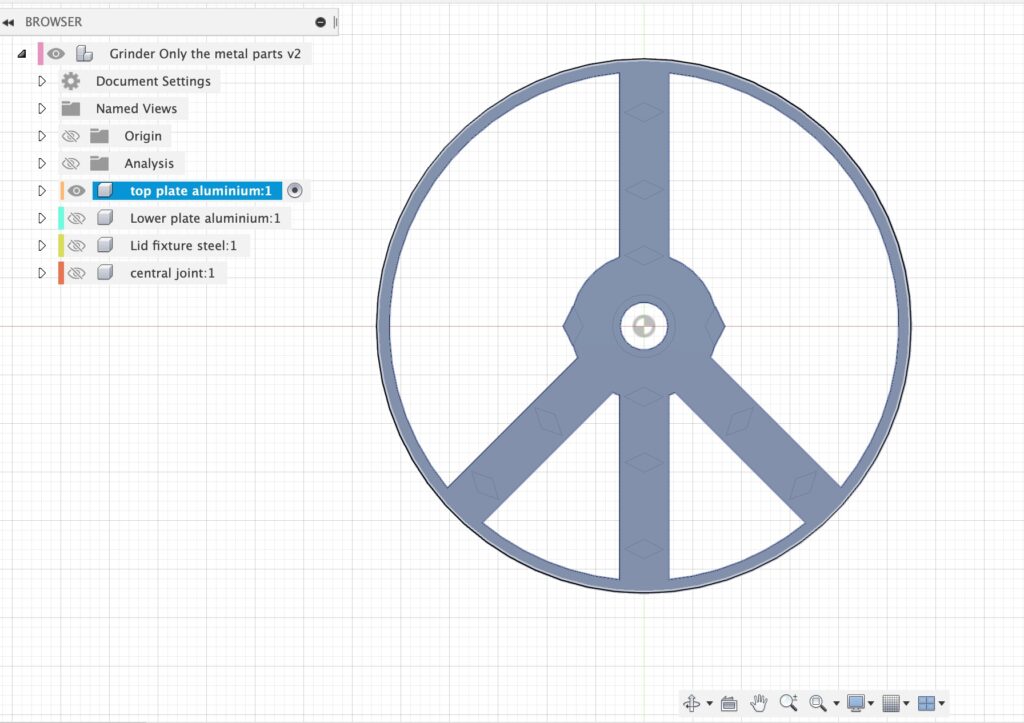
I think my design is a bit on the snobbish side more than on the practical side, and to keep up with S&B practically, I’ve changed few things, so now it’s made of two Aluminium parts , four Peek Plastic parts, and one clear Acrylic part.
The Griding chamber itself, went through a complete redesign, eliminating multiple parts and the need for multiple moulds, now it will be made of Anodized Aluminiun. No plastic.
The collection chambers/ filling aid was heavily refined, with airtight goal in mind and more useable space.
I think I came up with a way to make it airtight, I won’t say the filling aid will be 100% airtight, but the walls are now only 0.1mm clear of each other with upgraded thread, that is much better than the OEM.
I’ve modified the design of the clear part, that we use to push the herbs, will name it the Asher, and changed it’s design so now it has a 10mm wall, to make holding it easier, especially if you are wearing gloves.
I didn’t finish the design yet. It’s F1 weekend, and I promised my son to take him to the pool on Saturday, so It won’t be pulling a long weekend and finish it, but this is a sneaky peak on some of the parts, after all it’s Friday.
Improved Design
this is the first time I put the two section analysis next to each other, but as you can see, I’ve achieved the same functionality with fewer parts, and that will save money in production, making it cheaper, but not only that, I belive it’s way better.
If you look at the old design on the left, starting form the top, You can see the grinder lid, which used to be made of two parts, Plastic in the drawing is Yellow and Aluminium which is sky blue, in the new design it’s all one part and made of Aluminium, represented with the Yellow part in the second drawing.
The second part under it, we have what I call the grinder housing, and it was made of three parts in the old design, two plastic and one Aluminium and not only that, the plastic cone had to be threaded, but now the grinder housing is made of one Aluminium part and I ditshed the cone, by changing the design of the asher to make it easier to use and herbs free, not like the OEM.
I made the grinder 60mm in diameter, this is a good size that will fit a decent size nugget, and redesigned the grinding chamber, it’s nothing fancy, just functional.
New Grinder Lid
As you can see, the Lid is completely redsigned, with functionality, cost and look in mind.
Old Grinder Lid
In the old design, I wasn’t sure if there was enough cutting blades, but it looked really cool.
New Grinder Housing
This part has been heavily modified, changing the diameter was needed here, I won’t go into the details, but I want you to notice the new thread, this is what I mean with airtight.
Old Grinder Housing
Now there is obviously heaps of similarity, after all they are both Grinders, but the old one was made of three parts, which made getting it right, and putting it together, an expensive job.
Old Plastic Grinder HousingOld Aluminium Cutting platesPlastic Cone
As you can see, small parts with small details, for no reason, I did this to save weight, Now the total weight of the Aluminium grinding parts in the new design is 50gm comparing to 56.7gm, SO WE SAVED WEIGHT. I guess the reson is less walls or thinner walls, I won’t anlyis this.
One part that was modified because of the prototype was the Collection chamber/ Filling Aid. Now it’s bigger in the inside, where it matters.
New collecting Chamber/ Filling Aid
As i mentioned before it’s not completely finished, nevertheless; you can see the changes, if you compare to the OEM, which I was using for inspiration, now with no corners, it will be easier to use, and the extended wall on the Asher (the transparent part) will make holding it easier.
Meet Asher 🙂
These are the main Improvements, I think the design will be ready mid next week, I’m going to get it 3d printed here, so I can test the fitting and then get a new prototype made in China to test the functionality.
Now, when I started this project, it was supposed to be few thousand, but now it’s creeping into the tens of thousands, which I can’t afford, and for that reason I decided to put this project on Indiegogo.com, this way I will find out if the idea will sell, and get fund to make the first order.
So I’m hoping this will be the last prototype, I actually was working on the precampaign when I received the prototype from Markforged, which changed everything.
Hoping to launch the pre-campaign on Indiegogo.com before the end of next week, and have the product in the market for X-mas.
That’s all for this week, until next Friday stay safe,
Hello, and welcome to Cloud Riders Store, where I design, manufacture and sell accessories for Storz & Bickel Vaporisers (source manufacture). At the moment I’m working on few projects, the Mighty Grinder is the main one. It’s a Grinder that fits on the Mighty & Crafty vaporiser, using a similar filling aid device so you can grind right into it and savour every trichome. Also I’m in the middle of moving from Melbourne to the Netherlands and I’m almost finished designing and testing a Charging Stand for the Mighty.
I have to admit that I’m very new to the (source manufacturing) part of the business, and I’ve been tumbling like a toddler.
I’ve started my source manufacturing journey in Australia, I was planning to make all my products locally, help the economy and all, soon I realised that the economy should help me, I was getting quotes for the prototype in the thousand. almost $10K for the CNC work only, Ridicules numbers when you think how long it will take a CNC machine to make the Aluminium parts, & setup time, and their $350 hourly rate. it all didn’t add up.
And while I was looking in Australia still, some Chinese companies advertise globally, so I clicked on the ads, and got in contact with two overseas companies, I have to say one of them pushed me to finish everything and that was helpful, and they came back with design problems, which was also helpful, but looking back at the experience, now I believe those were brokers, they were not factories, prices were just a bit cheaper than Australia, and even when I gave them a target price, the quote was ridiculous. for example one Company asked for a $1 US for the small earth magnet that holds the plates, I sent them a link, showing that I can buy it cheaper in Australia, and still their revised quote stated a $1 per magnet, So that was it, two weeks gone.
In the mean time I decided if I’m looking in China, I should go to Alibaba.com, I have bought things in the past on Alibaba, and I believe you can find anything you want on it, so I went there and started looking for a supplier.
Now If you read the previous post you know that I was scammed by Shenzhen Bergek Technology Co.,LTD, and someone might argue that they didn’t scam me, but I believe they did, they gave me a quotation, that we negotiated and cleared all it’s point with a production time-line, and when I signed the order and transferred the money for the prototype, they turned around and said they can’t make the product for the price and they will look into it, then they said they will refund my money, & I should look for another supplier, I had to chase the refund, few days later I get most of my money, $130 AUD short, so you can judge it yourself.
Alibaba offers trade assurance witch I didn’t use for my transaction with Bergek, because it was’t that big amount and they seamed like a decent company, Mistake, it’s not Australia.
After that, one guy was trying to scam me flat out, we agreed on the details as I had a clear target after all the quotes, so I gave my target to few companies that were close to it, and while I was waiting for revised quotes, this guy was quick so I decided to go with him, He send me an invoice with a company name but no Business Number, and when I ask him to send me an invoice through Alibaba for the sake of trade assurance, because we are talking thousands, he turned around and said not everyone is on Alibaba, note that I posted my job on Alibaba, but he just want me to transfer the money so he can start working. That was that.
So as I said Last week I decided to change strategies and order and pay for a prototype, only a prototype, no strings attached, and that’s what I did, It was supposed to be ready in 7 to 10 working days, but now they said they will finish it on the 15th, and again I was hit with, Oh this can’t be done the way we thought we will make it and quoted it, which is a very frustrating fact on Alibaba, I think they bulk quote in general.
Saying that, I was expecting on Saturday, when the sales came back and said we can’t make this on the CNC, that they will cancel the order, but this Company is professional enough to first owner their quote and offer me options, eventually we agreed on a 3D print for the plastic parts and CNC for the Aluminium, this got me thinking about 3D printing again.
Now when I started this project, I was planning to go with 3D printing, but all my 3D wise friends told me that 3D printing is still far away from being the answer.
Until few days ago, I had no clue about 3D printing, I’ve been learning and working on 3D softwares for more than 10 years now, but I always render, for me I want a picture, and honestly I thought 3D printing is a cool toy, Until recently..
SO, if we are making the prototype on a 3D printer, why can’t I make 10 pcs on a 3D printer, and send them to shops so I can generate orders and get feed back,
With this idea I started looking for 3D printing services, and I started reading about the different kinds of 3D printing technologies, look like there are kinds, who knew??
Selective Laser Sintering (SLS), is really a cool technology, I really want one, I love the Fuse 1, maybe when the business is big enough.
Stereolithography (SLA) is another cool technology, much more affordable, the resin is not a pleasant material to work with but it’s not a toy, details and speed are reasonable, but the cost ain’t, if I buy something like the Form 3 from Formlabs, but there is the LCD technology now, which is really promising and the cost is much more reasonable, so that where I’m at at the moment.
I’m looking into new options, 3D printing look like a vital option, I have quotes from two printers in China, and I’m going to order the samples.
Markforged Australia, offered me a free Carbon-Fiber sample to check the quality of their prints (what a generous offer), and I’m very excited to see the grinder in Black Carbon-Fiber, and as the sales man just informed me, he will start printing on Monday. Exciting.
So Carbon-Fiber?
Who wants a Carbon-Fiber grinder?
I want one, I don’t know about everyone else, but I think everything looks better in Carbon-Fiber, my Motorcycle was Carbon-Fiber. I obviously love Carbon-Fiber.
So no pictures again this week, It’s very weird just to talk with no pictures, I guess it’s not a comic, but I believe there will be pictures next week, and I hope I will hear back from Formlabs, I would love to get a sample from them too.
Hello, and welcome to Cloud Riders Store, where I design, manufacture and sell accessories for Storz & Bickel Vaporisers (source manufacture). At the moment I’m working on few projects, the Mighty Grinder is the main one. It’s a Grinder that fits on the Mighty & Crafty vaporiser, using a similar filling aid device so you can grind right into it and savour every trichome. Also I’m in the middle of moving from Melbourne to the Netherlands and I’m almost finished designing and testing a Charging Stand for the Mighty.
Wednesday the 25th,
This was supposed to be a very happy post, where I tell you, I have placed an order, and the sample was supposed to be here by the end of June and then the first order to land in Australia by early August, but nothing of this is going to happen, because …
Well I don’t want to say I have been scammed, but this is how it feels at the moment, I have been negotiating with a company called Shenzhen Bergek Technology Co.,LTD and we’ve been sending emails back and forth for four days, discussing the quotation and the production time line, and after agreeing on all the point’s, I placed the order, signed it and transferred the money, and I get a response, that they can’t owner the quotation, the sales has made a huge mistake, and quote without the 3D drawing, only on the product description and a 3D drawing of the Aluminium parts, because they approached me first to do the CNC work, and when I sent the product description, they said we can make the whole product for you, and it will be a very competitive price, which it was, but then they didn’t owner it, like a car sales man, they lure you with the demo that was always sold by the other sales or the manger’s wife is driving it for the day.
So whatever you do in China, don’t deal with Shenzhen Bergek Technology Co.,LTD, they are time wasters, and especially Lexy Zhang, she doesn’t have a clue what she is talking about, she is nice and polite, but clueless, with a sales engineer title under her name.
Anyway, these were my sad news, but I have another supplier, actually two, and maybe on Friday when I publish this post, things wont be as grim.
Friday,
It’s still grim as, things ain’t moving forward, today I almost placed an order for 500 grinder, but I don’t think the supplier was legit, couldn’t find him on Alibaba, and the invoice doesn’t have a business license number, this sourcing business is a nightmare, my previous experience is sales not purchasing.
So based on that, and moving forward, I decided to change my strategy, i will order one piece for now, and then maybe 10, to use as samples so I can generate wholesale orders, and then I will place an order, this way the risk will be minimised and I won’t be throwing my hard earnd money in the bin.
So no pictures today, I still don’t have refund from the Bergek, they are taking their sweet time, and I’m filing a complaint with Alibaba first thing monday if I don’t have refund.
Peace out ☮️
Friday Late night:
After publishing the post, I have received a refund confirmation from Bergek and ordered a prototype and payed for it, it should be shipped next week, nothing like changing strategies.
And they just informed me, that they will start production tomorrow, this is moving forward now. so worst case scenario, I have prototype in 2 weeks, best case end of next week,
Now I don’t know what to talk about next week, maybe I will start talking about my second product.
Hello, and welcome to Cloud Riders Store, where We design, manufacture and sell accessories for Storz & Bickel Vaporisers (source manufacture), and at the moment I’m working on the Mighty Grinder project, It’s a Grinder that fits on the Mighty and Crafty, uses a similar filling aid device so you can grind right into it and savour every trichome.
Things are moving forward, doesn’t feel like it, but progress is there. In this order. 🙂
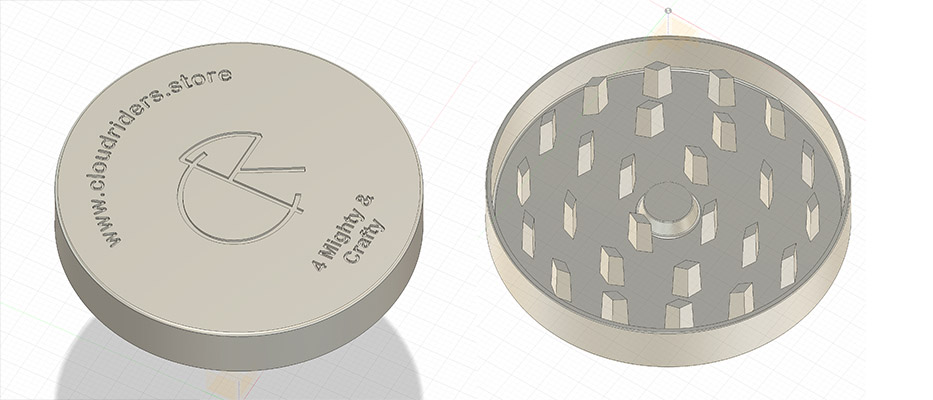
Last week after my post, I had to edit few details on the CAD file, but nothing major, I upped the size of the storage by 5mm, making the total height of the package 75mm, Now you can store a decent size bud in it.
In the picture below you can see what will come in the box.
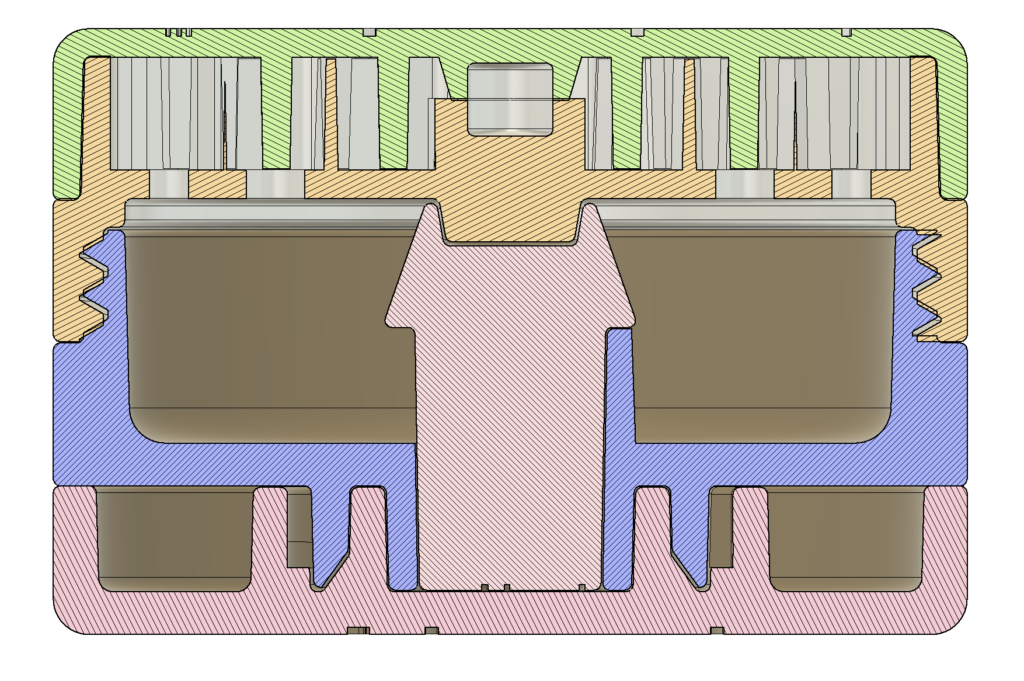
Mighty Grinder
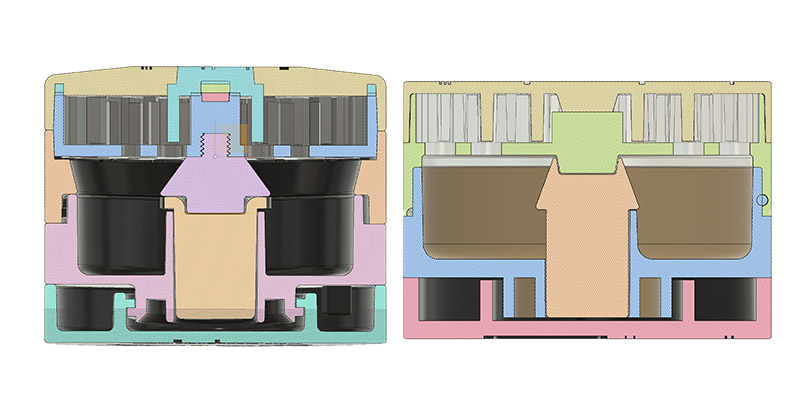
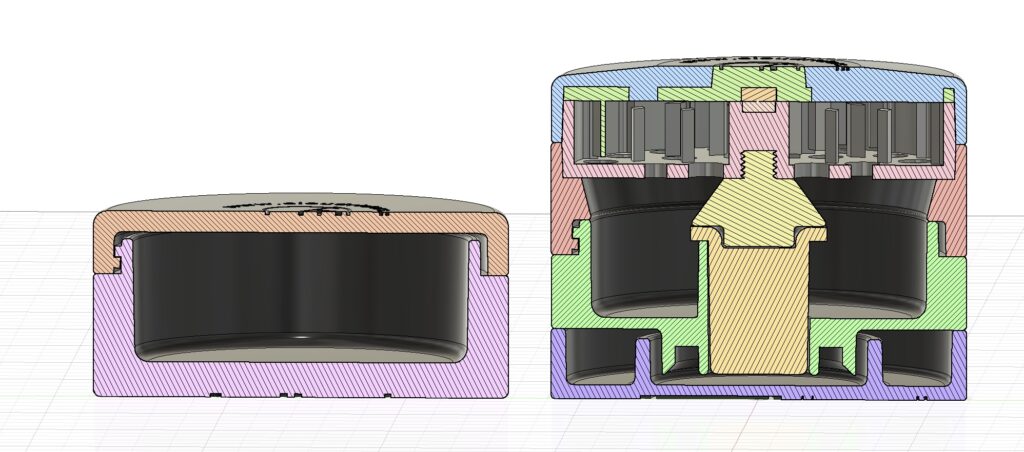
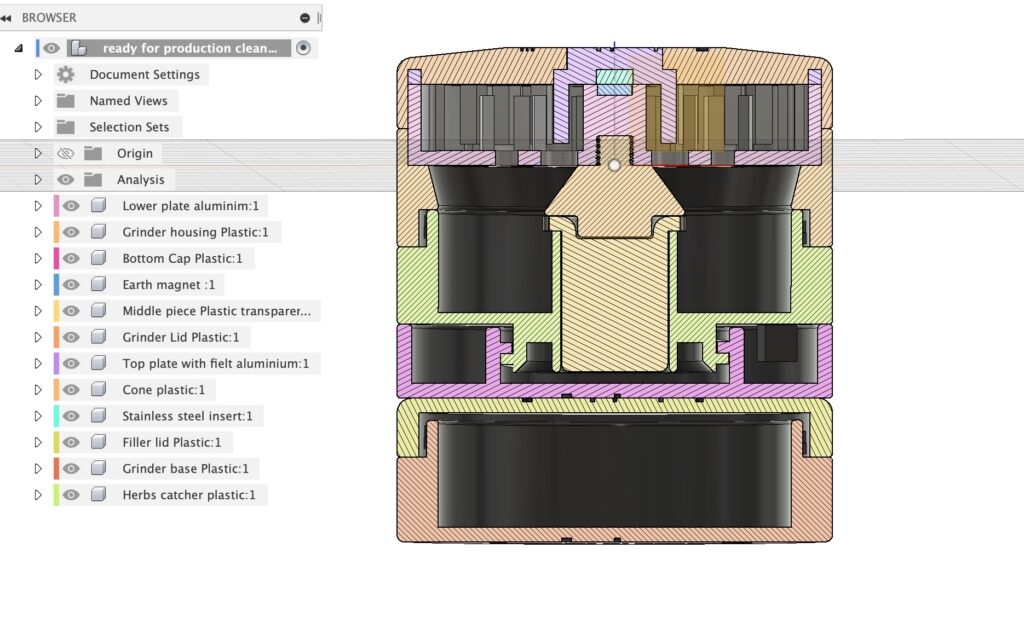
Below the section analysis so you can see through the walls. Super vision lol
Mighty Grinder Section Analysis
Looking at the right figure, the grinder, you can see how it will grind into a filling aid device, which can then be used to fill the mighty or the crafty and then you can use the base of the extra storage as a grinder base, which will serve two purposes, one as a base for the grinder, and two if you want to use the grinder as a normal grinder and not grind into the mighty/crafty filling aid
Then when you are finished using the filling aid, you can use the lid from the spare storage for the filling aid, and walla you have a stand alone filling aid and a grinder.
Production wise, I have been trying to make this bad boy in Australia, but the manufacturing rates here are ridicules, no wonder we closed all our cars plants.
So I went to China (not physically), I have been trying to source a manufacturer through Alibaba.com, and honestly the response is overwhelming, many companies had contacted me and offered to quote, so I’m waiting for all the quotes to come.
And after talking to the factories, I believe I’m set on the material.
The plastic will be Peek just like the mighty and crafty, Peek is black, so same colour also
The grinding plates will be made of Aluminium, 6061 or 6063, looking also into anodising the Aluminium, to give it a better finish and longevity.
The middle transparent part that we use to scope the herbs, will be made of acrylic, but I kept it solid, and not shell only, so it’s heavy and feels nice.
I’m coming close to the target supply price, not there yet, and it has to be the right quality but as Jerry Seinfeld said the wheels are in motion.
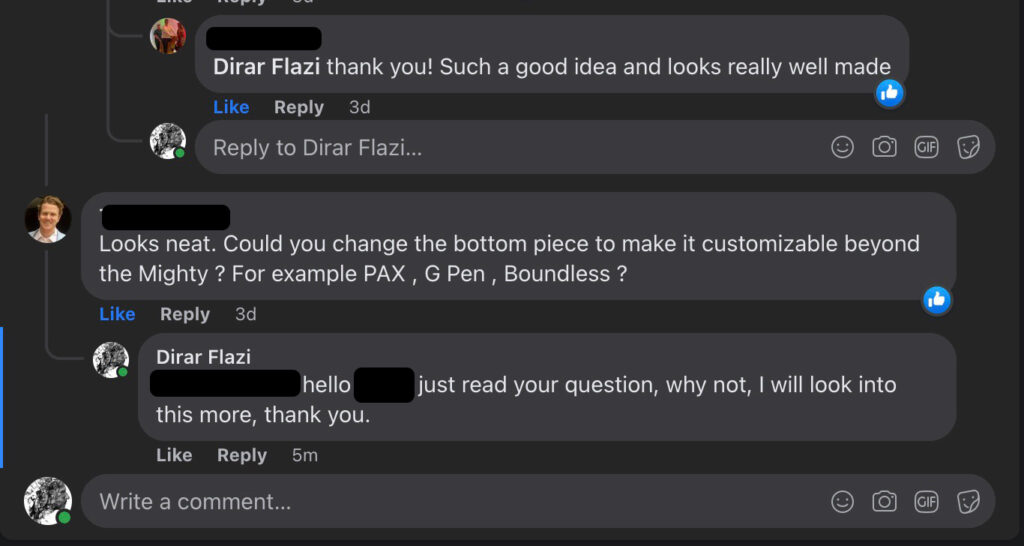
That’s all about production, but I have news about marketing, I posted about the grinder on a facebook group called Storz & Bickel users and the response was amazing, people want to buy my grinder, that made me very happy, 😃
My first post on FBPeople love itGetting invited to share on other groupsPeople are reading my blog 🙂Shut up and take my moneyImpressive 🙂I want one!!! Happy to payMake it Customizable 🙂
Obviously, you can tell I love it, I love that my product idea is well received, I’m looking forward more now to launch this product. and make it as high quality as it look.
Hello, and welcome to Cloud Riders Store, where We design, manufacture and sell accessories for Storz & Bickel Vaporisers (source manufacture), and at the moment I’m working on the Mighty Grinder project, It’s a Grinder that fits on the Mighty and Crafty filling aid device so you can grind right into it and savour every trichome.
As I’m getting busier, I will commet myself to a minimum of one post per week just to keep you updated, maybe soon I will be able to post more, especially when the prototype phase is over and I have more time, to work on the second product, and sales, I think it will be one post per week, lol.
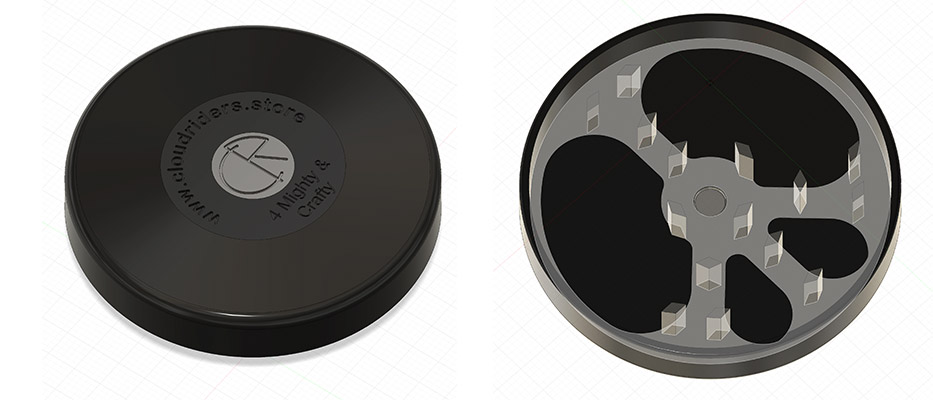
Okay; let us talk business, the first plastic prototype has arrived few days ago…
The Mighty Grinder first plastic prototype
And to be honest, I wasn’t impressed, I think it need to be a bit more elegant, plus I had some feed back from a manufacturer regarding some details that will make production easier so I have been doing some changes, nothing radical, although the renders might look like heaps has changed, I believe those upgrades will make it look far more expensive.
In a nutshell, I ditched the rings, and used the 2mm to thicken the walls, played with couple of measurements, added engraving, and changed the Peace sign look, but the over all size is still the same.
New Mighty Grinder DesignOld Mighty Grinder Design
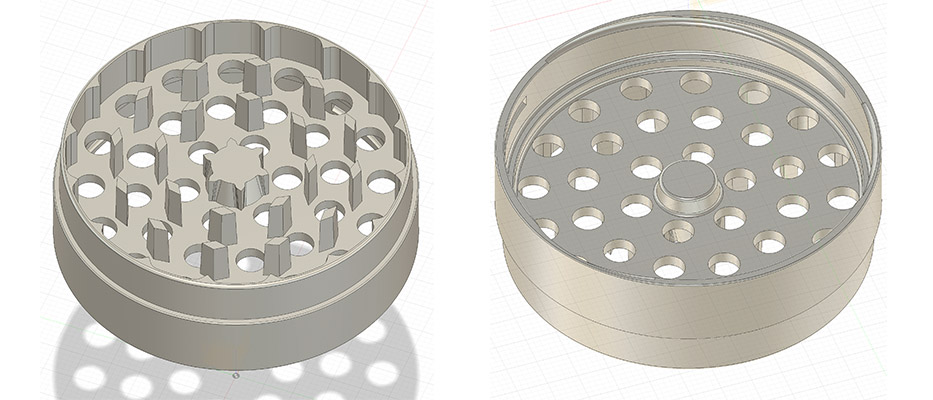
Now, if you look closely at the section analysis, you can spot most of the upgrades,
First all the walls gained a minimum of 1mm of thickness, this will make the grinder stronger and will feel better when you hold it, the smoth outer wall will set more comfortable in the hand, even the aluminium walls have been beefed up, and in this design the logo is engraved on the aluminium plate and it is visible from the lid, I think it will look sick, again we shall see.
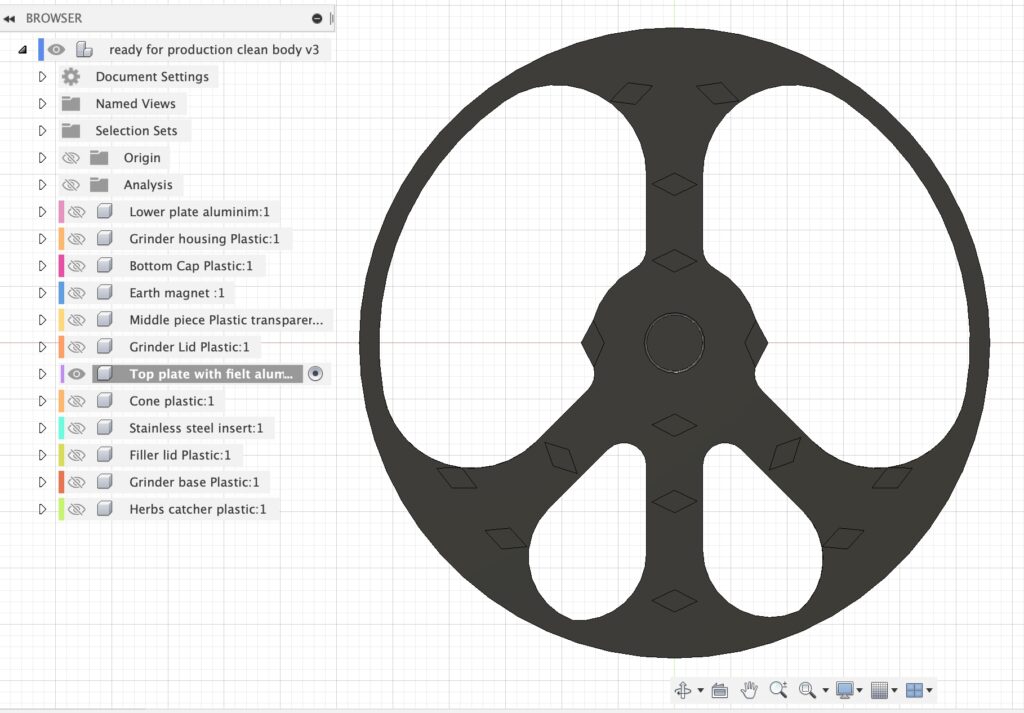
The herb catcher dimensions have been changed, and I’ve changed the middle fastner method, but the major change was due to a manufaring chalange, in the picture below you can see the old top cutting plate,
olld top plate design
And this can’t be done on a CNC machine because of the sharp corners, so I was asked to add fillet, and make smooth corners, which got me thinking, why don’t I use the fillet as a feature, I was always worried about the number of cutting teath, so I took this opportunity and added three extra cutting teath and this is the new top cutting plate.
New Top Plate
I think it will look sick, and it’s thicker, which mean it will be stronger, with three more cutting teath.
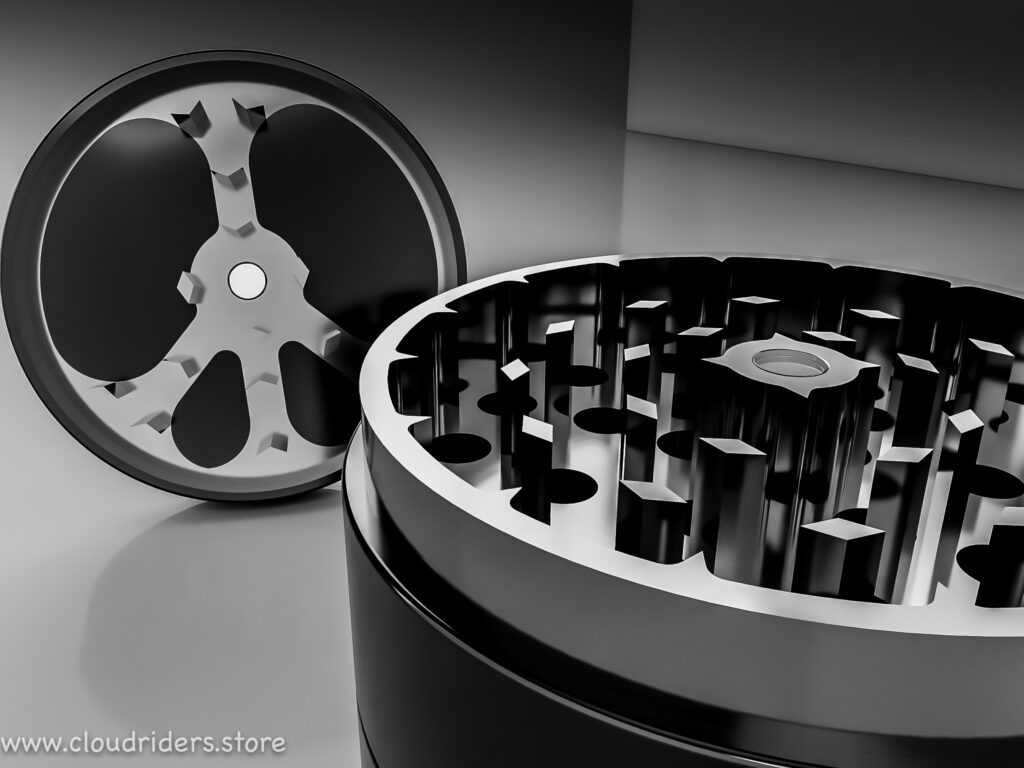
You can see the new top plate clearly in this render, the grinder’s walls are thicker and the outer smooth wall is giving it a more elegant feel. Maybe it’s just me 🙂
New Mighty Grinder top off
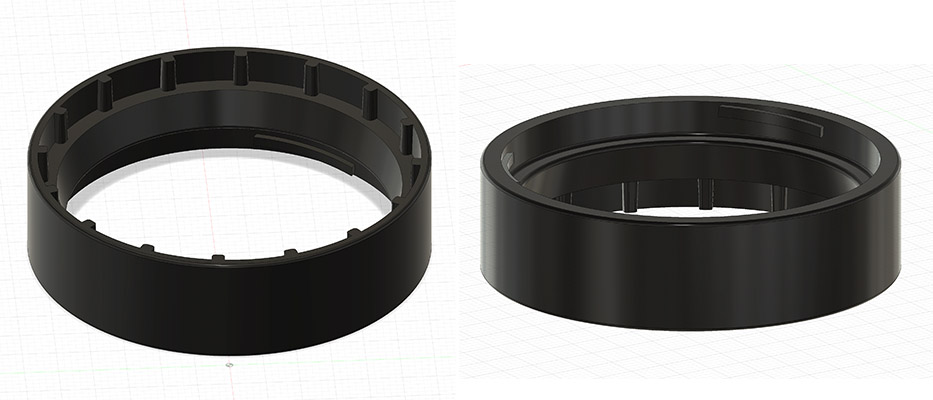
The new filling aid is shallower, as you can see in this picture, and the new central cone, is looking neater, it seals the filling piece completely when grinding so no herbs can go inside of the transparent bit, which is sealed at the top.
The Updated Mighty Filling Aid
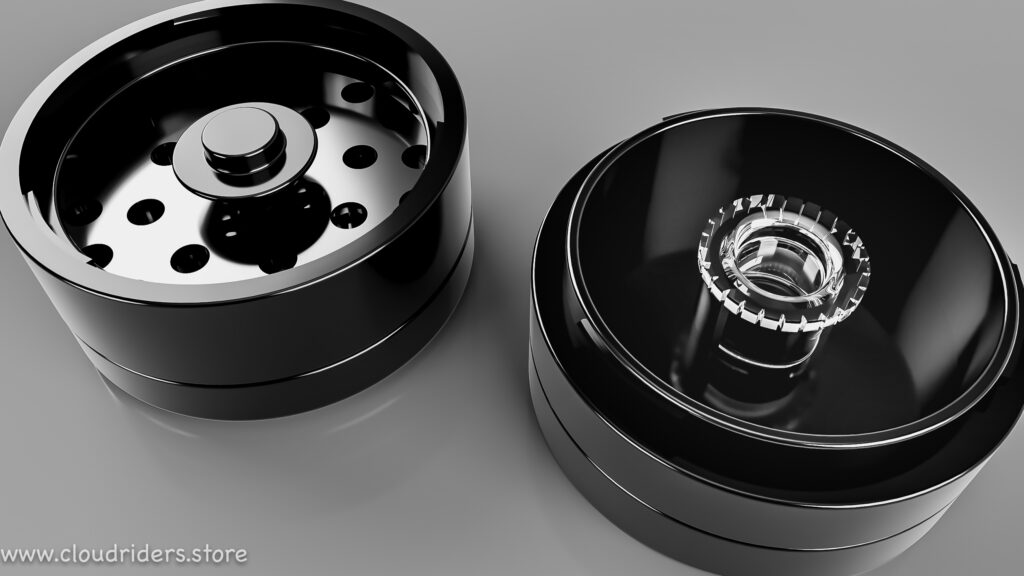
This theard picture is a clear example of the new wall’s thickness, at the moment I’m aiming to use Peek plastic, so the grinder will have the exact same finish like the Mighty & Crafty vaporiser.
Mighty & Crafty Grinder
I saved the engraving for last 🙂
As you can see in this render, the aluminium inside the plastic look sick, I mean this will be one special grinder, when you put it on the table next to your Mighty or Crafty, it will look cool 😎.
Sexy Grinder
Obviously, I still don’t have a functioning prototype yet, there were some hiccups with the factory in China,
Honesty; I’ve been looking at, and talking to factories, and I’m learning a lot of things about production, and how to prepare a CAD file for production, special considerations and requirements I wasn’t aware of regarding CNC capabilities, and rules of plastic molding.
But all and all, I think the progress is good and maybe by the end of the month, I will have my first functioning prototype.
I have nothing more to report, folow us on instagram.
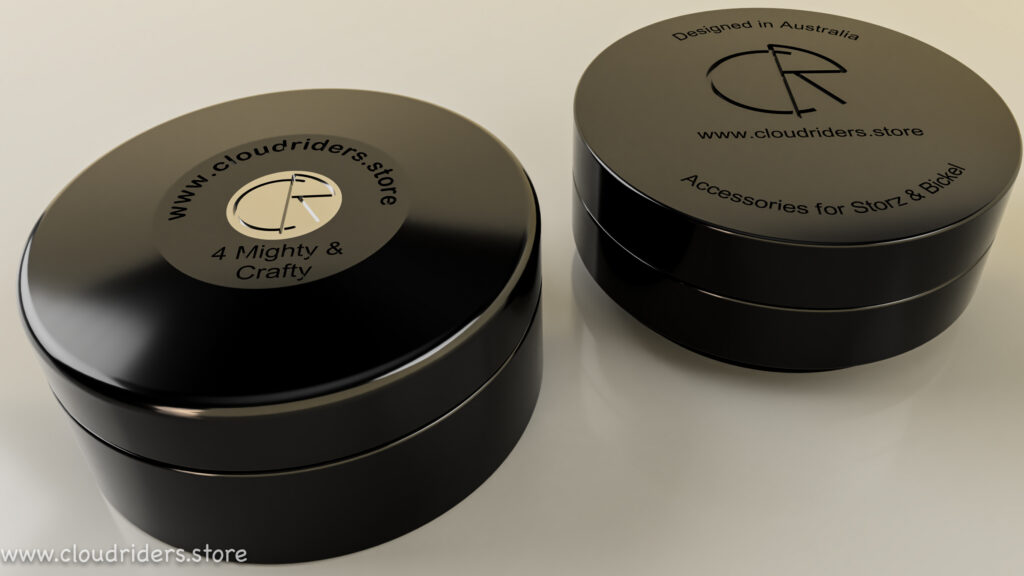
Very soon for comfort, I know, but I have changed the logo,
If you read yesterday post, I mentioned in the last paragraph that I’m not liking the logo, and today we have a new logo,
I know, things happen fast here in Cloud Riders, where we design and prduce accessories for Storz & Bickel, and the grinder prototype is just around the corner, 🙂
But back to the logo, here it is:
Cloud Riders Logo
I believe this will look much nicer on the box, just a white box with our name and logo, and the name of the product, simple, cost effective and discreet.
The CR will be engraved on the lid of The Grinder, that’s why I had to finish this befor ordering the prototype.
Well, that’s it for today, soon I will be grinding my herbs and getting a perfect blend directly into the Mighty filling device with my grinder prototype, exciting times 🙂